Blogging Using a Markdown Editor
Tools and Techniques for Easing the Mechanics of Blogging
Background
I frequently get the impulse to share what I have discovered by blogging. Since I also enjoy writing one might assume that I blog frequently, but that is not the case. This is largely because of the difficulties involved in actually writing a well-formatted blog post populated with appropriate graphics or code examples, difficulties imposed by most of the on-line editors I've used. On-line editors tend to be cumbersome and clumsy affairs that frequently defy attempts at taming them to arrive at a well-formatted blog that's easy to read and doesn't scare away readers by resembling something your six-year-old brought home from first grade. (Those childhood attempts are charming mementos of family life but they belong on the refrigerator, not a professional blog post.)
After bouncing around among various solutions, Word, a couple of Markdown editors and an on-line editor or two, I have settled on my current work flow as explained in the topic that follows. This may change in the future if I find even better solutions that enable me to share my experiences in an efficient and aesthetically pleasing manner.
Current Workflow
My current workflow follows a fairly simple pattern:
- Outline my intended blog post using a Markdown editor.
- Author the post by expanding the outline, also using a markdown editor.
-
Incorporate graphics as the blog is authored.
- Take shots of relevant screens, save them appropriately, and link them into the blog text.
- Obtain other relevant graphics and treat them in a manner similar to screen shots.
- Develop any appropriate gists to illustrate code and save them at Github. Include them in the post authoring as I proceed.
- Copy and paste the finished blog post to the blogging website's editor.
- Tweak graphics if necessary. Tweaks are generally size considerations.
- Make a final review
- Publish the blog
MarkdownPad 2
For a Markdown editor I currently use MarkdownPad 2 Professional. Here's a screen shot of MarkdownPad 2. There's nothing particularly special about the User Interface:

- The left panel shows the original Markdown you enter as you compose the blog.
- The right panel shows the reformatted text produced by MarkdownPad 2 from your original text1.
Flavors of Markdown
MarkdownPad 2 supports six "flavors" of Markdown2:
- Markdown
- Markdown (Classic)
- Markdown (Extra)
- Github Flavored Markdown (GFM)
- Github Flavored Markdown (Offline)
- Commonmark
Each flavor exposes features unique to the particular implementation of Markdown indicated. For example, GFM supports an extensive selection of emoji tags. Markdown Extra adds support for simplified table construction, Abbreviations (Tool Tips), and Definition Lists (but has no emoji support).
For blogging, where I have relatively full control of the formatting and CSS, I use Markdown Extra, to take advantage of the significant capabilities of the flavor. On the other hand, if I'm composing for a Github Readme I'll stay with one of the Github flavors to avoid using features not available on Github.
You'll want to choose your flavor based on individual needs and preferences. The flavor is easily changed in the Options dialog.
Some Caveats Before You Buy MarkdownPad 2
Some MarkdownPad 2 users complain that no further development has taken place for a number of years while others characterize MarkdownPad 2 as "abandoned." I personally have had excellent success with the product while also noting that development has not advanced for several years. The developer, Evan Wondrasek is currently a Software Development Manager at Amazon. The website remains operational and still accepts payments and so far as I can tell responds by providing a license key to unlock the full feature set. The website also features a fairly extensive FAQ and Support Forum.
I did have one technical issue with the Github Flavored Markdown related to GFM Online Mode and SSL/TLS channel crashes. It was easily solved by this Registry Hack.
All of this being said, I still personally like MarkdownPad 2 and will continue to use it for blogging as well as other tasks that require the preparation of HTML text.
Blogger
MarkdownPad 2 creates some of the cleanest HTML and CSS I have seen in some time. Unfortunately, Google's Blogger has some of the most complex and obfuscated code I have seen.
This matters for a couple of reasons:
- Blogger templates do not produce very aesthetically pleasing formatting. They have a lot of pretty pictures and colors chosen by a graphic artist, but that's not what I'm creating. I want people to easily see what I've written and gain some insights thereby.
- Changing the formatting is done using CSS, the same as it is for all HTML that is displayed by a browser. So the only way to improve the formatting is to change the CSS used.
- Determining the CSS, while fairly easy, is complicated by the Google template structure that makes the specification of Selectors somewhat less than obvious.
Template Formatting
A number of blog entries and even Google's help screens describe various ways to modify a template's CSS. I wasn't able to find any that worked for me. Instead, here's what I did:
- Determine the appropriate selectors for my desired modification.
- Update the template CSS to my desired settings.
Depending on the extent of your modifications updating the template CSS can be a time-consuming and frustrating exercise. The good news is that you only have to do it once; after that, the template remains for all your blog posts that use that template. The only time you'll have to reenter the world of Google templates is if you decide to make changes to the template. Keep a couple of things in mind as your work, however:
- Changing the template affects all posts that use that template, past, present and future.these are global changes.
- You will probably be wise to back up your modified template as you work so unsuccessful changes can be easily removed by restoring the backup copy. (There are menu selections for this in the template customization dropdown.)
If you are new or insecure about CSS or HTML, now might be a good time to sharpen your skill set in those areas. There are a number of good tutorial and reference sources on the Internet:
- W3 Schools
- This site features a number of courses covering various languages and protocols. The reference page on CSS Selectors is particularly useful in the present context.
- MDN Web Docs
- Another high-quality site that features a number of useful tutorials and reference pages. Use the MDN Web Docs Home Page to access all of its offerings.
- Browser Development Tools
- Modern browsers feature powerful suites of developer tools. The exact nature and functionality of each suite varies somewhat from browser to browser, although they all enable you to examine or modify a web page once it has been loaded into the browser. The MDN Article What Are Browser Developer Tools? contains a good overview of browser tools along with extensive links to documentation specific to particular browsers.
Overview of Updating a Blogger Template
The following steps assume some familiarity with CSS and Browser Development Tools. If you're new to either of these technologies, you may want to sharpen your skills using one or more of the previously mentioned resources.
Determine the CSS
A good starting point for Markdown CSS can be obtained from the MarkdownPad 2 style sheets. In the options dialog choose the CSS Style Sheet that approximates your desired result. Tools==>Options then Style Sheets button. Then export your document using File==>Export==>Export HTML. Open the resulting file in a text editor to access a full set of CSS styles that correspond to the option you chose. Here's a sample of what you might find:
/* BODY
=============================================================================*/

body {
  font-family: Helvetica, arial, freesans, clean, sans-serif;
  font-size: 14px;
  line-height: 1.6;
  color: #333;
  background-color: #fff;
  padding: 20px;
  max-width: 960px;
  margin: 0 auto;
}

body>*:first-child {
  margin-top: 0 !important;
}

body>*:last-child {
  margin-bottom: 0 !important;
}

/* BLOCKS
=============================================================================*/

p, blockquote, ul, ol, dl, table, pre {
  margin: 15px 0;
}

/* HEADERS
=============================================================================*/

h1, h2, h3, h4, h5, h6 {
  margin: 20px 0 10px;
  padding: 0;
  font-weight: bold;
  -webkit-font-smoothing: antialiased;
}

h1 tt, h1 code, h2 tt, h2 code, h3 tt, h3 code, h4 tt, h4 code, h5 tt, h5 code, h6 tt, h6 code {
  font-size: inherit;
}

h1 {
  font-size: 28px;
  color: #000;
}

h2 {
  font-size: 24px;
  border-bottom: 1px solid #ccc;
  color: #000;
}

h3 {
  font-size: 18px;
}

h4 {
  font-size: 16px;
}

h5 {
  font-size: 14px;
}

h6 {
  color: #777;
  font-size: 14px;
}

body>h2:first-child, body>h1:first-child, body>h1:first-child+h2, body>h3:first-child, body>h4:first-child, body>h5:first-child, body>h6:first-child {
  margin-top: 0;
  padding-top: 0;
}

a:first-child h1, a:first-child h2, a:first-child h3, a:first-child h4, a:first-child h5, a:first-child h6 {
  margin-top: 0;
  padding-top: 0;
}

h1+p, h2+p, h3+p, h4+p, h5+p, h6+p {
  margin-top: 10px;
}

/* LINKS
=============================================================================*/

a {
  color: #4183C4;
  text-decoration: none;
}

a:hover {
  text-decoration: underline;
}
Determine the Template Selectors
Selectors are the key to applying CSS Styles. Determining the correct selector to use can be daunting given the extensive and chaotic nature of Google Templates. Here's a quick overview of how to make that task easier:
- Open a blog entry that uses the template you want to modify. Then click F12 to open the Developer Tools for the page. Click the
Elementstab and theStylestab. You should see something similar to the following: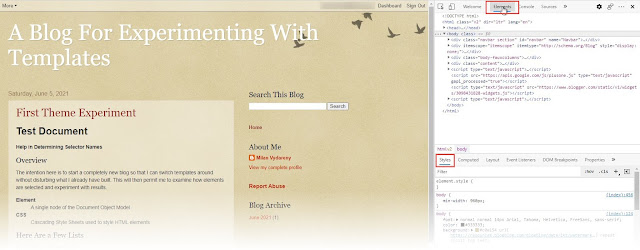
- Click the Element Selector icon in the upper left corner of the Developer Tools panel.

- Identify the container for your blog post by using your mouse to hover over various parts of the blog post page. The Developer Tools will highlight various elements as you pass the mouse over them. Eventually you will discover a container that includes all of your blog post but excludes all of the boiler-plate that generally surrounds a blog page. You generally only want to modify the blog post, not the boiler-plate, although you may also modify the boiler-plate using this technique if you want to. When you finally identify the container, note the selector suggested in the properties box in the upper left hand corner.

- If you also click on the container you have identifed, this will highlight the Element entry in the Developer Tools Panel. Clicking on this Element entry will also yield similar information to what you have already seen.

Update the Template HTML
Open the Blogger Main Menu. Click Themes and make sure that the template you want to update is selected at the top of the page. Then from the Customize drop-down button choose Edit HTML.

Make the desired CSS changes in the HTML that is displayed. In this example, the CSS for the template begins around Line 175 with the Content comment. I began adding my changes following the original Content section. Here's what a portion of the finished changes look like. My changes begin with the Body comment. Also note that every selector has been changed to reflect the selector I determined earlier. In this case, all of my CSS changes were directed to elements having the .content-inner class, so each and every selection begins with .content-inner.
/* Content
----------------------------------------------- */
body {
  font: $(body.font);
  color: $(body.text.color);
  background: $(body.background);
  padding: 0 $(content.shadow.spread) $(content.shadow.spread) $(content.shadow.spread);
  $(body.background.override)
}

html body $(page.width.selector) {
  min-width: 0;
  max-width: 100%;
  width: $(page.width);
}

body, p {
    margin: 25px 0;
}

h2 {
  font-size: 22px;
}

a:link {
  text-decoration:none;
  color: $(link.color);
}

a:visited {
  text-decoration:none;
  color: $(link.visited.color);
}

a:hover {
  text-decoration:underline;
  color: $(link.hover.color);
}

.body-fauxcolumn-outer .fauxcolumn-inner {
  background: transparent $(body.background.gradient.tile) repeat scroll top left;
  _background-image: none;
}

.body-fauxcolumn-outer .cap-top {
  position: absolute;
  z-index: 1;
  height: 400px;
  width: 100%;
}

.body-fauxcolumn-outer .cap-top .cap-left {
  width: 100%;
  background: transparent $(body.background.gradient.cap) repeat-x scroll top left;
  _background-image: none;
}

.content-outer {
  -moz-box-shadow: 0 0 $(content.shadow.spread) rgba(0, 0, 0, .15);
  -webkit-box-shadow: 0 0 $(content.shadow.spread.webkit) rgba(0, 0, 0, .15);
  -goog-ms-box-shadow: 0 0 $(content.shadow.spread.ie) #333333;
  box-shadow: 0 0 $(content.shadow.spread) rgba(0, 0, 0, .15);

  margin-bottom: 1px;
}

.content-inner {
  padding: $(content.padding) $(content.padding.horizontal);
}

/* BODY
=============================================================================*/

.content-inner body>*:first-child {
  margin-top: 0 !important;
}

.content-inner body>*:last-child {
  margin-bottom: 0 !important;
}

/* BLOCKS
=============================================================================*/

.content-inner p, .content-inner blockquote, .content-inner ul, .content-inner ol, .content-inner dl, .content-inner table, .content-inner pre {
    margin: 15px 0;
}

/* HEADERS
=============================================================================*/

.content-inner h1, .content-inner h2, .content-inner h3, .content-inner h4, .content-inner h5, .content-inner h6 {
    margin: 20px 0 10px;
    padding: 0;
    font-weight: bold;
    -webkit-font-smoothing: antialiased;
}

.content-inner h1 tt, .content-inner h1 code, .content-inner h2 tt, .content-inner h2 code, .content-inner h3 tt, .content-inner h3 code, .content-inner h4 tt, .content-inner h4 code, .content-inner h5 tt, .content-inner h5 code, .content-inner h6 tt, .content-inner h6 code {
  font-size: inherit;
}

.content-inner h1 {
  font-size: 28px;
  color: #000;
}

.content-inner h2 {
  font-size: 24px;
  border-bottom: 1px solid #ccc;
  color: #000;
}

.content-inner h3 {
  font-size: 18px;
}

.content-inner h4 {
  font-size: 16px;
}

.content-inner h5 {
  font-size: 14px;
}

.content-inner h6 {
  color: #777;
  font-size: 14px;
}

body>.content-inner h2:first-child, body>.content-inner h1:first-child, body>.content-inner h1:first-child+h2, body>.content-inner h3:first-child, body>.content-inner h4:first-child, body>.content-inner h5:first-child, body>.content-inner h6:first-child {
  margin-top: 0;
  padding-top: 0;
}

.content-inner a:first-child h1, .content-inner a:first-child h2, .content-inner a:first-child h3, .content-inner a:first-child h4, .content-inner a:first-child h5, .content-inner a:first-child h6 {
  margin-top: 0;
  padding-top: 0;
}

.content-inner h1+p, .content-inner h2+p, .content-inner h3+p, .content-inner h4+p, .content-inner h5+p, .content-inner h6+p {
  margin-top: 10px;
}

/* LINKS
=============================================================================*/
When you have finished making your changes be sure to click the Save icon at the top right of the screen. You may then view the results of your changes by using the Blogger Preview function. However, be aware that once you save the template, the changes will affect every blog post that uses it. After viewing your changes, you can quickly make any modifications or corrections you might discover.
Once you get the template the way you want it, you shouldn't have to go through this exercise again. Making extensive changes can take a half day or more of your time depending on your existing fluency and skill set. If you face a learning curve, it will potentially take even longer. Sometimes it might be better to approach the changes incrementally to avoid making massive mistakes that only have to be redone correctly. Testing small changes will confirm your skills and give you confidence to proceed.
Posting Blog Text
To publish a blog, open the Blogger on-line editor. Switch to the HTML view by choosing HTML View from the tool bar. It's the very far left button. Then:
- Select everything in the editor window and delete it.
- In MarkdownPad 2 main menu choose Edit==>Copy Document at HTML. This will copy the HTML but not any of the CSS (which you have already placed in the template).
- Paste the document into the Blogger on-line document editor.
- Click Preview to see the completed blog entry.
If you're happy with the blog entry, click the Blogger Publish button at the top right of the screen.
Alternatives
There are a number of alternatives to MarkdownPad 2 suggested by various users. Some of the suggestions follow, although I haven't tried them all. I leave it to the reader to determine what the best path for composing Blog entries is given their own particular circumstances.
- Markdown Monster
- CuteMarkEd
- Typora Markdown Editor and Reader (Mac and Linux)
- Markdown Preview Enhanced Runs as an extension to either Atom or Visual Studio Code features a powerful Math typesetting capability as well as a number of charting capabiliies. Mac or Windows.
Conclusion
Blog prepration is greatly eased by using a Markdown editor to prepare the blog text. The choice of editor depends on the blogger's own style, objectives and technical skills. One-size-fits-all is not apropos. Modifying your blog host's template to suit your own preferences and needs can take a substantial effort and involve a heavy learning lift, although it is generally only required one time as you establish your blog.
Aside from entertainment, the overall objective of any blog is to communicate useful information to its audience. Facilitating that communication in a clear, effective manner can be enhanced by bloggers who find ways to reduce or eliminate the time-wasting, error-prone drudgery involved in so much of the Internet's development. Using an appropriate Markdown editor may be one way to eliminate wasted effort thereby allowing bloggers to focus on what matters—effective communication.
Footnotes
-
Final formatting in the blog depends on the CSS your blog software employs, so the final output may not be exactly what you see in the MarkdownPad 2 preview pane. But it will likely be very close. ↩
-
Some of the features of Markdown Pad 2 are only available in the Professional (Paid) version. See MarkdownPan 2 Feature Comparison for details. The cost of the Professional edition is a relatively modest $15, but see the discussion about MarkdownPad 2 Caveats. ↩


No comments:
Post a Comment