Android USB Debugging With RAD Studio and Hyper-V
A Step by Step Guide
Overview
I use Microsoft's Hyper-V running one or more instances of a Windows 10 Guest as a development environment. I was recently working some tutorial from the Embrcadero Docwiki involving Livebindings and got to one that used an Android device as a target. The tutorial was trivial, but I suddenly realized I had no idea of how to debug an Android device over USB from a Hyper-V Guest. If you simply connect the device to your PC using an available USB port RAD Studio running in a Guest OS will not be able to "see" the device or connect to it. After a considerable amount of Googling I discovered a relatively easy way to do this.
The solution involves implementing device pass-through, which is a way of passing control of the device from the Host OS to the Guest OS thereby allowing the Guest OS to work with the device as though it were physically connected to the Guest instance.
There are a lot of moving parts to the solution but none of them are particularly difficult. For many of them, if you make the correct settings once you won't have to change or remake them in the future.
What follows is a step-by-step guide to my solution to this problem. There may be other solutions that involve specialized software, messaging and other gymnastics, but I have not explored those. Also, this solution works for my particular stack of hardware and software but may require appropriate modification if your stack differs. However, the basic principles should be applicable to all supported hardware and software.
Let's get started.
The Objective
To enable to run RAD Studio on a Guest Instance of a Hyper-V Host and debug Android applications.
Hardware
There is nothing particularly special about my hardware. My workstation is definitely on the vintage side, but it still serves me well so I see no need to replace it just yet. Here's the short list:
- Dell Precision T3500
- This is a venerable old tower workstation with an Intel Xeon CPU, 4 cores, 8 logical logical processors, 24 gigabytes of RAM and about 2 terabytes of conventional disk space (not SSD).
- Samsung Galaxy S9+ Phone
- Given to me by a friend, this is a garden-variety Samsung.
- Samsung Galaxy S10+ Phone
- Also a gift from the same friend.
Software
I don't use pirated or unlicensed software. Here's a partial list of relevant software.
- Windows 10 Professional (Host)
- This is the Host OS, fully patched and updated with Microsoft's current maintenance running Hyper-V hypervisor.
- Windows 10 Professional (Guest)
- This is one Guest OS. It is also fully patched and updated with current Microsoft maintenance. It runs as a virtual instance.
- RAD Studio 10.4.2
- the RAD Studio we all know and love, fully patched with current Embarcadero maintenance. No special components are needed for implementing device pass-through.
Terminology
In this blog post I use the following terms:
- Host
- This refers to the OS that runs when you boot the workstation. It runs Hyper-V and controls the other OS instances that run in the system.
- Guest
- This refers to an OS that runs as a virtual machine under the control of the Host Hyper-V. Some people prefer the term VM rather than Guest, but I use the latter.
- ADB
- This acronym stands for Android Debug and generally refers to the driver or bridge that permits Android debugging over USB. We'll see this used specifically when we get to driver installation later in this blog.
Driver Installation
Drivers are somewhat tricky. Generally, you need to follow two steps to prepare your system with ADB drivers.
- Obtain the driver for your particular mobile device
- Install the driver on your system.
Google provides a list of OEM USB drivers at Install OEM USB Drivers. Scroll down the page for an extensive list of links to OEM drivers. In my case, since both my mobile devices are Samsung phones, I chose the Samsung link.
Warning: The instructions about installing USB drivers provided by Google on the page are incorrect, at least for Samsung drivers. They may be correct for drivers other than Samsung, but I have no way of determining that.
Samsung provides a downloadable .exe that installs its drivers. You download the file and run it. That's the end of it. There's no messing with the Device Manager required, just Download and Run.
For both the Host and Guest the results of installing Samsung drivers is not visible until you actually connect a Samsung device using a USB cable and enable the device Developer Options. That comes later and you will eventually see what has happened.
For OEM's other than Samsung you may have to follow the Device Manager method Google describes; it's up to you to determine the correct way to install drivers for your devices.
Host Driver
Samsung drivers must be installed on your host machine. Download the drivers from the Samsung Driver site and execute it.
Guest Driver
The same drivers must be installed on your guest machine as well. Sign in to your guest machine, download the file, and execute it.
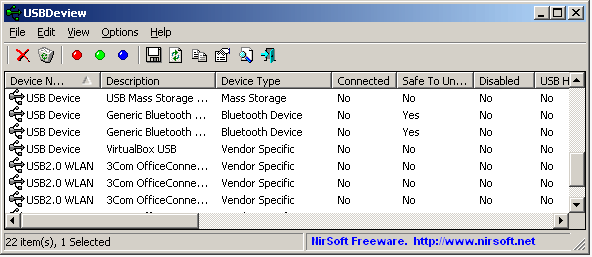
Bonus: USBDeview
Sometimes it is difficult to manage USB drivers on a Windows system. To help you manage USB drivers, try the free utility from NirSoft called USBDeview. You can download a free copy at USBDeview v.3.01. The utility requires no installation. Download the .zip file, unzip it and execute the utility.
Hyper-V Settings
Hyper-V has a number of settings that determine its behavior. We're only concerned with one setting for this project. To check this setting open the Hyper-V Manager.
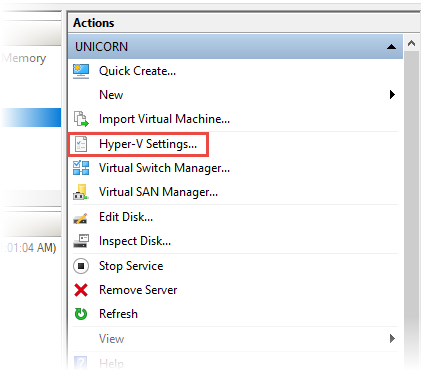
Hyper-V Host Setting
In the Actions panel choose Hyper-V Settings.... This will open the settings dialog for the Host. In the Settings Dialog left hand selector panel under Server choose Enhanced Session Mode Policy. This will display the Enhanced Session Mode Policy setting in the adjacent panel. Make sure that the policy is checked to Allow enhanced session mode. The policy is enabled by default in all of my Hyper-V instances, so this is just insurance that the policy is enabled and you shouldn't have to change it.
 .
.
Guest Setting
There is no corresponding Guest setting in the Hyper-V Manager for Enhanced Session Mode Policy.
Group Policy Settings
Group Policy turned out to be the most difficult part of the solution for me. Not because I don't understand Group Policy, but because the required settings were only mentioned in one place that I was able to locate in my search.
General Comments
Group Policy can be frustrating. First of all, it tends to be confusing because of the sheer number of possible settings and because many settings have names that are identical or similar to other settings in a different part of the policy tree. Some care is required to ensure that you have indeed located the desired policy.
Further complicating Group Policy is the fact that policy changes do not take effect immediately upon change. Besides saving the policy you must generally update the policy on the desired machine, most typically by using a command:
gpupdate /force
In some cases you must reboot the OS to get the changed policy to take effect.
If you are unsure as to what policies are actually applied to your machine you can use the following command to generate an interactive report you can display in your browser.
gpresult /h <targetfile.html>
where targetfile.html is the fully qualified name of the file to receive the output report. The file should by an html file that you can then display in your browser. It's complexities are beyond the scope of this current discussion.
In all the discussion that follows, the Group Policy Editor is launched by pressing Win+R (for Run) and entering the following:
gpedit.msc
 .
.
Note that this is the Local Group Policy Editor. Also, there are two main sections to the Local Computer Policy Tree:
- Computer Configuration
- User Configuration
Each of these has identically named sub-items. Be careful to choose the correct sub-item when editing Local Group Policy.
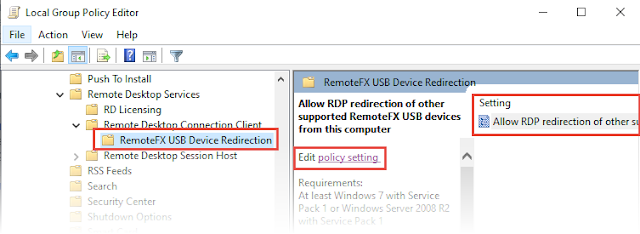
Host Group Policy Setting
The Host Group Policy requires a change to one setting. Launch while logged in to your Host machine, launch the Local Group Policy Editor and navigate to
- Computer configuration
- Administrative Templates
- Windows Components
- Remote Desktop Services
- Remote Desktop Connection Client
- RemoteFX USB Device Redirection
There is only one policy in this sub-sub-item. Select it. Under Setting in the right hand panel select Allow RDP redirection of other supported RemoteFX USB devices from this computer You should see:
 .
.
Click policy setting to open the policy setting dialog.
 .
.
Enable the policy by clicking the Enabled radio button. Also, select the desired Access Rights. Generally this will be Administrators and Users but you may also limit this to Administrators only if you desire. Choose your selection from the dropdown.
After making your desired changes click Apply then OK to exit the dialog. Close the Group Policy editor and run gpupdate /force to apply the policy. Note however that you must also reboot your computer to make this policy take effect. You can wait to reboot until after you've made a similar policy setting for the Guest.
Guest Group Policy Setting
The Guest Group Policy setting is similar to the Host Group Policy Setting, except you must log in to your Guest instance to make the change. To get started, log in to your Guest instance and launch the Local Group Policy Editor by pressing Win+R, typing gpedit.msc and pressing Enter. Then navigate to:
- Computer Configuration
- Administrative Templates
- Windows Components
- Remote Desktop Services
- Remote Desktop Session Host
- Device and Resource Redirection
From the right panel under Setting select Do not allow supported Plug and Play device redirection. Your should see the following display:
 .
.
Click policy setting to display the policy setting dialog:
 .
.
Disable the policy by clicking the Disabled radio button. Then Click Apply and Close. Close the Local Group Policy Editor and run gpupdate /force from a command box.
Finally, reboot your Guest instance. After rebooting, log off the Guest.
Back on the Host system, reboot the Host.
Mobile Device Preparation
Preparation of the device follows the customary procedures you may already know and understand.
Cable Connection
Connect the device (typically a phone) to the Host using a USB cable.
Enabling Developer Options
Enable Developer Options by navigating to
- Settings
- About Phone
- Software Information
Tap Build number seven times. As you do this, the phone will display a toast indicating you're about to enable Developer Options. You may be asked for your Pin before the options are enabled.
Back up two levels to Settings and scroll to the very end. Observe that Developer options now appears at the end of the list. Click Developer options to set options. Initially, only two options are of great interest:
- Stay awake
- Turn this option on to prevent your phone from sleeping while charging. This is a convenience to you as a developer to keep the phone active as you work debugging.
- USB Debugging
- You must turn this option on to enable USB debugging. When you turn
USB Debugging on a prompt will appear requesting permission. Choose OK to dismiss the prompt, turn on USB Debugging and proceed.
This completes preparing the device for USB debugging.
Checking Host Device Manager
You may want to examine your Host Device Manager to be certain that you have made correct changes to allow device pass-through. To do this, type Device Manager in the Windows search box and launch the Device Manager. You should see entries similar to the following:
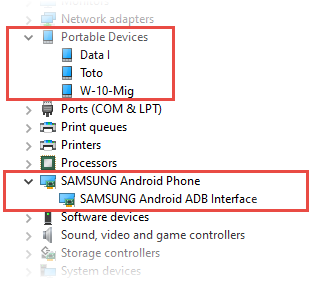
Besides the expected entry in Portable Devices (in my case Toto is the name of the phone after Dorothy's dog in the L. Frank Baum children's story), you will find the entry Samsung Android Phone and its accompanying Samsung Android ADB Interface. These last two items indicate that your Host is correctly configured for device pass-through and recognizes the phone as being eligible for debugging.
Note that this illustration is for my particular hardware/software stack. If you are working with a device from another vendor, Google for example, the results will probably appear different from mine, but the basic idea will still prevail. You may have to hunt a bit until you find the corresponding Device Manager entries for your device.
Connecting to the Hyper-V Guest
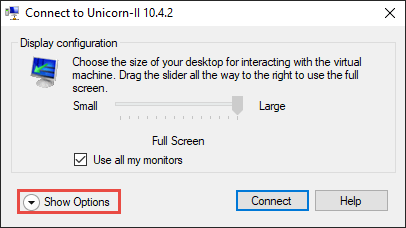
Before connecting to your Hyper-V Guest instance there are some Session Settings to consider. Launch the Hyper-V Manager and choose Edit Session Settings... If you are currently logged on to your Guest you will have to log off before you can modify Session Settings.
Session Settings
When the Session Settings dialog appears choose Show Options to display the Options Dialog:
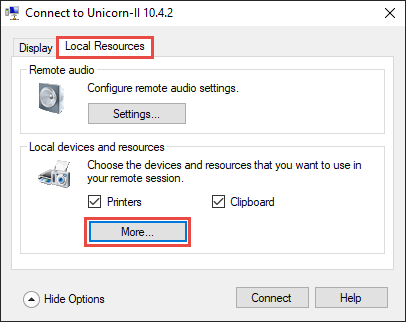
When the Session Options Dialog opens, choose the Local Resources tab and then the More button.
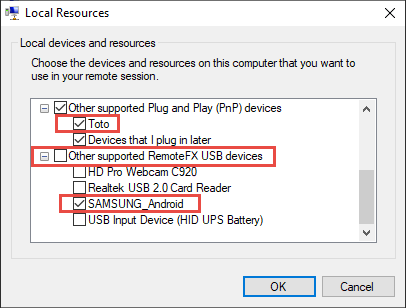
Scroll down the Local Devices and Resources list. Check the entries related to the device you want to use in your Guest Session. In my case, I checked the box for Toto (my phone) and also Samsung Android, which is the pass-through entry to permit USB debugging.
Connect to Hyper-V Guest Instance
After choosing the appropriate settings, connecting to the Guest instance proceeds normally. Click OK and then Connect to connect to the Guest instance.
Checking Guest Device Manager
After logging on to the Guest Instance you can check the presence of the pass-through device by opening the Guest Device Manager. After opening the Device Manager you should be able to find entries for your device similar to the following:

Start RAD Studio
The moment we've all been waiting for has now arrived. In your Guest Instance, launch RAD Studio.
RAD Studio Requirements
The requirements for RAD Studio are what you'd expect:
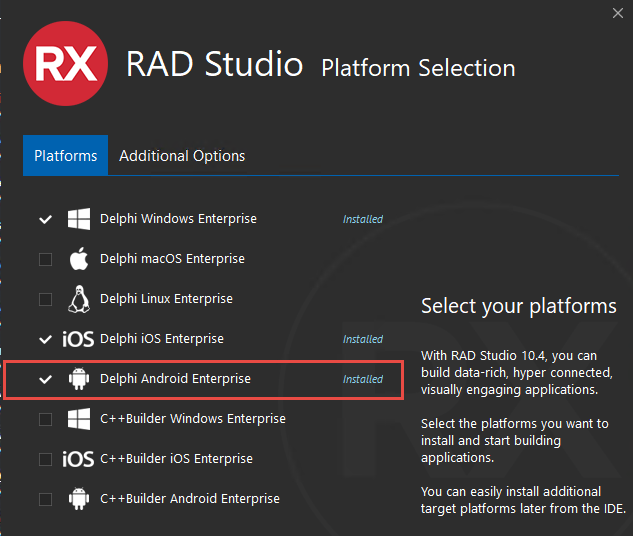
You must at least have the Android Platform installed in your RAD Studio configuration.
RAD Studio Project Settings
To debug an Android application, you of course must have an Android target specified. In the example case, I was using the trivial Livebindings tutorial material from the Embarcadero Docwiki. Around the twelfth tutorial or thereabouts, the tutorial targeted an Android device.
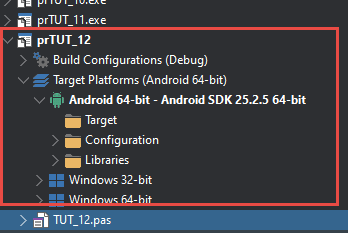
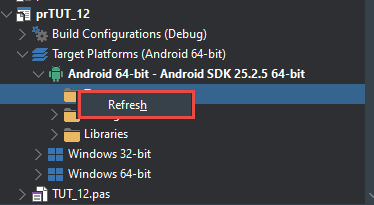
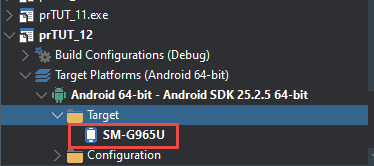
Using Refresh to Populate a Target Device
Notice, however, that the Target devices is not yet specified. To enable RAD Studio to recognize your target device right click Target and choose Refresh from the context menu that appears. (It's the only option.)
At this point your device will probably ask for permission to allow USB debugging. Respond in the affirmative and proceed.
We finally arrive at the objective of this rather long and tedious exercise. You can now proceed with normal USB debugging of your application on the USB tethered device.
Congratulations!
Conclusion
Although there are many settings to be made in a variety of places, none are particularly difficult if you follow a plan and make your settings carefully. Checking the Device Manager along the way, as we have done here, will help isolate any errors or difficulties you may have encountered.
Further, most settings are persistent, meaning you only have to make them once and they'll "stick" so the next time you need to test an Android device from a Hyper-V Guest you won't have to go through the same obstacle course again.
If you're like me, when you're done with a testing session, you'll disconnect your phone and turn Developer Options off. The next time you want to start a debugging session you'll have to turn Developer Options on again (tap... tap... tap... seven times!) However, the remaining settings will probably remain available without further intervention unless you change devices or need to change an option setting. So ongoing, trouble and difficulty is minimized.
Thanks for reading this long and involved blog. I hope it provides an easy path to enable your Android USB Debugging from a Hyper-V Guest.
As always, comments and suggestions are welcome.