Using Delphi's FireMonkey Vertical Scroll Box With a Virtual Keyboard
Background
Input fields on a FireMonkey form become problematic when the application is ported to a mobile device. Mobile devices frequently do not have hardware keyboards; in place of the hardware keyboard Android provides a virtual keyboard, e.g. a visual keyboard on-screen with a layout similar to a hardware keyboard that can be used for input. The problem arises when the virtual keyboard covers a part of the original form, often obscuring the input field and depriving the user of the visual cues used to verify input.
The solution to this is to use a vertical scroll box component for the input fields so that they may be positioned above the virtual keyboard thus allowing the user to visually observe the input process. In vernacular terms, everything "slides up" to reveal the current input field.
It turns out that this involves programming a number of events that respond to changes in the field focus, the appearance and disappearance of the virtual keyboard and the positioning of the vertical scroll box viewport. Embarcadero provides a sample project to demonstrate this that frankly is typically deficient in that it doesn't work correctly much of the time, has code that is completely uncommented and undocumented and that assumes some pretty extensive knowledge of FireMonkey internals. In short, the sample is of little value as a learning or teaching tool.
My purpose here is to try to provide some needed information about FireMonkey components and how they may be used to solve this problem; to provide running applications that illustrate some of the FireMonkey behaviors that I encountered; to provide a simple Delphi component that encapsulates the techniques I developed to solve this problem; and to provide a working example of my solution that may be used as a model for further development. I have attempted to do this with heavily documented code and meaningful naming conventions that will assist the reader in understanding what I have discovered. Additionally, this posting and three subsequent postings offer more detailed discussion of the applications.
There is source code that accompanies these blogs. The project group FMXVertScrollBoxEtude can be downloaded from GitHub:
https://github.com/Pasquina/FMXVertScrollBoxEtude/releases
Source code was developed using RAD Studio 10.1 Berlin (No updates.)
There is source code that accompanies these blogs. The project group FMXVertScrollBoxEtude can be downloaded from GitHub:
https://github.com/Pasquina/FMXVertScrollBoxEtude/releases
Source code was developed using RAD Studio 10.1 Berlin (No updates.)
Approach
ScrollBoxEtude Project Group (ScrollBoxEtude)
The ScrollBoxEtude project group was established to aggregate the four projects used to explore this problem. Each of the four projects within the ScrollBoxEtude project group has a specific objective. The code is written to illustrate that objective. All projects can be compiled for Windows 32 and 64 bit or Android executables.
Understanding Scroll Boxes (ScrollDemo.exe)
Understanding Scroll Boxes (ScrollDemo.exe) is provided to allow the manipulation of a scroll box interactively and to display the various parametric results of the user-entered manipulations. Examining the source code comments will add further insights into the way Scroll Boxes work.
Understanding Events and Event Parameters (VKLogger.exe)
There are a number of events that must be handled to implement a scroll box solution to the virtual keyboard obfuscation of input fields. VKLogger.exe interactively logs the firing of a number of important events along with the values of their parameters.
Building a Scrolling Component (VyDVSBFMXScroll.bpl)
The TVyDVSBHelper component combines all of the necessary code and event handling needed to implement a vertical scroll box solution to the virtual keyboard input field obfuscation problem. After installing the component, it is dropped on a form containing a vertical scroll box that contains the input fields. A single property connects TVyDVSBHelper to the scroll box. This is the only code needed to implement the solution.
Scrolling Demo Program (VKScrollDemo.exe)
VKScrollDemo.exe illustrates the use of the TVyDVSBHelper with a vertical scroll box populated with input fields. Additionally, it illustrates a suggested approach to field navigation (not handled by the component) and summarizes a couple of minor anomalies in the way FireMonkey or Android handles events and displays the various virtual keyboards.
Understanding Scroll Boxes
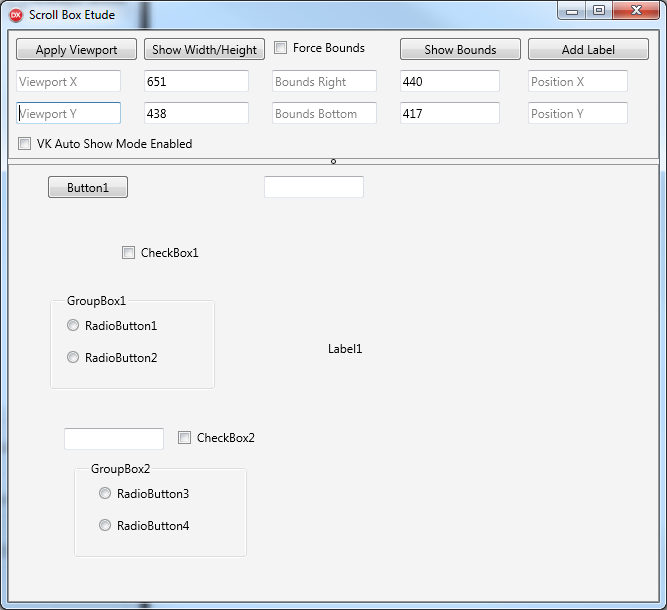
Run ScrollDemo.exe. The following screen is displayed. The bottom portion of the window consists of a scroll box populated with a number of random controls. The top band consists of a number of controls that enable the manipulation and display of scroll box contents and properties.
 |
| Scroll Box Etude: Scroll Demo |
Show Width/Height Button: Pressing this button will show the width and height properties of the scroll box. These values don't change unless the size of the scroll box on the form changes. Since the scroll box is aligned to client you can resize the form and that will cause the scroll box to resize. Pressing the button again will show the new height and width.
Beep: If you resized the form and pressed the Show Width/Height button, you probably noticed a beep. This is an audible signal programmed in the CalcContentBounds event handler. It's to let you know that the Content Bounds have been recalculated by the scroll box. This beep also sounds when the application starts, since the scroll box calculates the Content Bounds on startup as well.
Show Bounds: Pressing this button displays the Content Bounds of the scroll box. Content Bounds is the rectangle that exactly includes all child controls. The content bounds extend from 0, 0 to the farthest point horizontally and vertically used by child controls. Note that this does not have anything to do with the Width and Height of the scroll box. Initially, the demo program Content Bounds is smaller in both directions than the width and height. This is because the child controls do not extend to the edges of the scroll box. In fact, if a control extends beyond the the width or height of the scroll box, the bounds will be adjusted by the scroll box to include the control. This adjustment sometimes occurs automatically, as when the height and width of the scroll box itself are changed (try resizing the window to see this) or it can be caused programmatically by invoking the RealignContent method of the scroll box.
Add Label: A label can be added at any arbitrary position by first specifying the X and Y coordinates of the upper left hand corner of the label rectangle and then clicking the Add Label button. For example, enter 200, 200 for the X and Y coordinates and click the Add Label button. (Beep as bounds are recalculated. The bounds are recalculated by the routine that adds the label. This is not automatic. The label add routine invokes the RealignContent method after the label has been added.) The label appears at the specified location. Click Show Bounds and notice that the content bounds values have not changed. this is because the label added lies completely within the existing content bounds. Now try adding a label at 1000, 1000. (Beep!) Now click Show Bounds and discover that the bounds are now much larger than previously. They are even larger than the 1000, 1000 specified for the label's position. This is because the label position is the top left of the label, and the bounds have been expanded to include the length and height of the label that extend to the right and down from the position. But there's more: scroll bars have appeared on the scroll box. You can now scroll down and to the right to view the newly added label. (You must have the ShowScrollBars property of the scroll box set to True for the scroll bars to appear.)
Apply Viewport: You can position the contents of a scroll box to a specified position in the visible control window by changing the viewport position. For example, you can specify a viewport of 100, 100, and point 100, 100 within the content bounds will be placed at point 0, 0 in the visible control window. This is analogous to moving the window contents by using the scroll bars. It is not always possible to position the viewport to something other than 0, 0. If the content bounds of the control do not extend beyond the width and height of the control window, then no repositioning is possible. Another way of thinking of this is by observing the scroll bars on the window. If no scroll bars are visible, then no repositioning is possible, either programmatically or by using the scroll bars. The maximum amount of the repositioning is determined by the content bounds. You cannot reposition the viewport if it would result in moving the right or bottom content bound to a value less than the width or height respectively of the scroll box window.
Force Bounds: Without any special handling, when the scroll box bounds are recalculated, they include everything from 0, 0 to the right and down sufficient to exactly include all child controls but no more. It is possible to override this calculation by using the CalcContentBounds event. This event is fired when the RealignContent method is invoked. It is the only way the content bounds can be set programmatically without changing the child content of the scroll box. The ContentBounds property of the scroll box is read-only. This property can only be changed by the CalcContentBounds event handler. This is an important technique to master. To change the content bounds to arbitrary values, the CalcContentBounds event handler must return the new content bounds values to the invoker. If the content bounds are not changed by the event handler, then the default calculated values will be retained. The Force Bounds check box exploits this behavior. First, click Show Bounds to display the current values. Then enter new bounds values in the entry fields beneath the Force Bounds checkbox. Finally, check the Force Bounds checkbox and click Show Bounds again to display the new values. Notice that the content bounds have changed to the specified values but no new controls have been added to or removed from the scroll box. Only the bounds have been changed. Uncheck the Force Bounds checkbox to cause the default content bounds values to be restored. The CalcContentBounds event handler examines the state of the checkbox to determine whether or not to override the default bounds calculation. Remember, to change the content bounds programmatically, you must write a CalContentBounds event handler and then invoke RealignContent to cause the event to fire. This behavior is an important part of repositioning the viewport to avoid hiding input controls when the virtual keyboard is displayed. This is discussed further in a later blog.
VK Auto Show Mode Enabled: This is a minor feature of this demo that forces the display of the virtual keyboard even when it is not required. Input fields have a KeyboardType property that allows the designation of the type of keyboard to be displayed when the field has the focus. When the target device has a hardware keyboard, the default behavior is to not display the virtual keyboard, instead allowing the user to perform data entry using the hardware keyboard. This checkbox overrides that behavior and forces the system to always display the virtual keyboard, even when it is running on a device with a hardware keyboard. Virtual keyboards have greater variety when the program is run on a mobile device. While the virtual keyboard will appear on Windows, it is completely different in appearance from the mobile version. To observe the program's behavior, check the VK Auto Show Mode Enabled. When an input field receives the focus, the virtual keyboard is automatically displayed. Moving to another input field preserves the virtual keyboard display. However, if the focus is moved to a field that does not require input, the virtual keyboard is hidden.
Conclusion
This completes the discussion of the ScrollDemo.exe project. You are encouraged to download the project group and experiment with the program to gain a feel for scroll boxes and how they can be manipulated programmatically. Additionally the source code for the program is dense with comments that help explain the various features, the reasons for the methods and their operation.
In the next blog, we'll take a look at the VKLogger.exe project that examines events and their parameters as they relate to solving the virtual keyboard obfuscation issue. In addition, we'll take a look at navigation during data input.
See the next post in this series at FireMonkey TForms: Events for Virtual Keyboard Navigation and Scroll Box Control
Comments are welcomed. Thanks for reading this far.
Comments are welcomed. Thanks for reading this far.


Absolutely great job! I've been searching the web looking for a clue on how to solve this keyboard issue, and i couldn't find any working solution, just guesses and spaguetti code.
ReplyDeleteAgain great job and many thanks on sharing this, your solution helps me a lot on my project.
Best Regards
Rogerio
Thank you for your work on this, it's much appreciated
ReplyDelete