Monday, July 19, 2021

FireMonkey String Grid Responsive Columns

FireMonkey String Grid Responsive Columns

Code to Cause Column Widths to Change When String Grids Are Resized

Overview

I have a FireMonkey application with the following characteristics:

  • The form layout is generally responsive to changes in size
  • The form contains a string grid; I wanted the column widths to also behave in a responsive manner, e.g. change size predictably when the grid is resized
  • LiveBindings are used to populate the UI fields
Responsive Columns

Sample Project

There is a sample project for this blog post available for download at Responsive FireMonkey Grid on GitHub.

Note that the sample project is quite simple but the code for string grid column resizing is heavily commented. The sample code with comments is the best source of how the Responsive Columns were implemented.

General Form Layout

Ways to make a FireMonkey form responsive are generally well-known. In this case, my standard practice is to use one or more TGridPanelLayout components to divide the form into the desired regions. Inside each cell of the TGridPanelLayout I placed a TLayout to enable grouping several visual components in a single TGridPanelLayout cell. In one case I nested another TGridPanelLayout in the target cell to permit further responsive behavior.

The TStringGrid is simply handled as a child of one of the TLayouts.

At this point the form will behave in a responsive manner, observing the various specifications for absolute or percentage sizes as the form itself is resized. What remains is the handling of the column resizing, which cannot be specified directly.

Calculating Column Widths

The routine CalcColumnWidths in the main form does the actual work of calculating and specifying the column widths for display. It uses a two-dimensional array of constants that specifies the parameters for each column:

  • Minimum column width
  • Maximum column width
  • Proportion of total space available in the string grid for each column

The column widths are set as follows:

  • The calculation starts by summing all of the proportion values for the column array. This sum is used as the denominator for individual column calculations.
  • Next, each column is handled by first calculating the proportional value of the available space using the column's proportion specification as the numerator and the previously calculated denominator.
  • Finally, the calculated value for the column is constrained by the specified minimum and maximum values for the column.

The value finally determined is used to set the column width.

Invoking the Column Width Calculation

Column width calculation is invoked in two places:

  • By the OnResized event of the string grid itself.
  • By the OnActivated event of the LiveBinding for the String Grid. (This insures that the columns are correctly set immediately after the dataset is activated.)

Conclusion

This solution requires a bit of code but seems to be flexible, reliable and relatively easy to implement. Since the developer provides the code (and hence determines the algorithm used for sizing) it can easily be modified to suit any need or preference.

Thanks for reading. As always, comments welcomed.

Wednesday, July 7, 2021

ARC in Delphi

Delphi Red Herrings: Hidden Virtual Methods

Trying to Grasp the Depths of a Universe Far, Far Away

Genesis

Working on some development I discovered a memory leak. This is not uncommon, and since I had just made some code changes it should have been easy to track down and fix. "Problem solved!" Unfortunately, it took a lot longer than that and after reading dozens of blog posts, Embarcadero DocWiki pages and many Stackoverflow answers, I was still uncertain of what was happening. Even my favorite Delphi gurus on Stackoverflow had apparently never answered a question quite like mine.

Summary

There's a small demo program at https://github.com/Pasquina/ARCinDelphi.git that you really need to download in order to try some of the simple things I mention here.

There are two classes defined in the program:

  • A Parent Class
  • A Child Class

The parent is descended from TInterfacedObject and hence the child (as a descendant of Parent) also has TInterfacedObject as an ancestor. A couple of empty interfaces are defined to permit referencing.

The child class uses the inherited directive to invoke the Create and Destroy methods of the parent. When you run the program and push the button (the only object that responds to a click on the small form) instantiation proceeds using interfaces, first a parent concrete instance and then a child concrete instance. As instantiation proceeds, ShowMessage is used so you can follow the events as they take place.

Finally, after both concrete instantiations take place, the routine exits the event handler, causing the instantiated objects to go out of scope. From here, the compiler and ARC take over and dispose of the concrete instances.

As the concrete instantiations are destroyed a ShowMessage tracks the events so you can follow the progress of object lifetimes. The messages should look like this:

Creating Base Class Instance (From Event Handler Code)
Base Object Create (From Base Class Create Method)

Creating Child Class Instance (From Event Handler Code)
Base Object Create (From Base Class Create Method via Inherited Directive)
Child Object Create (From Child Class Create Method)

Exiting Scope (From Event Handler Code at the Very End)
Child Object Destroy (From Child Class Destroy Method)
Base Object Destroy (From Base Class Destroy Method via Inherited Directive)
Base Object Destroy (From Base Class Destroy Method)

Not So Fast

While all of this behavior so far is expected, let's try a small experiment.

Remove the override directive from the Child Class Destroy method and run the program as before.

The first thing you notice is you get that annoying message from the compiler about

method... hides virtual method of base type ...

As far as I can tell, that simply isn't true. You can still "see" the base method with code, reference it, invoke it using inherited and so forth. Hidden from who or what?

Then if you run the code, the ShowMessage trace looks like this:

Creating Base Class Instance (From Event Handler Code)
Base Object Create (From Base Class Create Method)

Creating Child Class Instance (From Event Handler Code)
Base Object Create (From Base Class Create Method via Inherited Directive)
Child Object Create (From Child Class Create Method)

Exiting Scope (From Event Handler Code at the Very End)
Child Object Destroy (Missing! Gone fishing! Disappeared!)
Base Object Destroy (From Base Class Destroy Method via Inherited Directive)
Base Object Destroy (From Base Class Destroy Method)

But wait! There's more. Close the program and you get the following from the ReportMemoryLeaksonShutdown that has been enabled for the program.

An unexpected memory leak has occurred. The unexpected small block leaks are:
Etc., etc.

Put the override directive back on the Child Class destructor and things are fine.

Conclusion

I don't know what the intended behavior is supposed to be for this, but I do know that inadequate documentation of all kinds cost me a lot of time figuring out what was going on. Avoiding the problem is easy enough. Triage is another matter.

If anyone has better answers than the ones I've given, I'd like to hear them. Please leave comments if you have more information on this odd behavior.

Sunday, June 6, 2021

Blogging Using a Markdown Editor

Blogging Using a Markdown Editor

Tools and Techniques for Easing the Mechanics of Blogging

Background

I frequently get the impulse to share what I have discovered by blogging. Since I also enjoy writing one might assume that I blog frequently, but that is not the case. This is largely because of the difficulties involved in actually writing a well-formatted blog post populated with appropriate graphics or code examples, difficulties imposed by most of the on-line editors I've used. On-line editors tend to be cumbersome and clumsy affairs that frequently defy attempts at taming them to arrive at a well-formatted blog that's easy to read and doesn't scare away readers by resembling something your six-year-old brought home from first grade. (Those childhood attempts are charming mementos of family life but they belong on the refrigerator, not a professional blog post.)

After bouncing around among various solutions, Word, a couple of Markdown editors and an on-line editor or two, I have settled on my current work flow as explained in the topic that follows. This may change in the future if I find even better solutions that enable me to share my experiences in an efficient and aesthetically pleasing manner.

Current Workflow

My current workflow follows a fairly simple pattern:

  • Outline my intended blog post using a Markdown editor.
  • Author the post by expanding the outline, also using a markdown editor.
  • Incorporate graphics as the blog is authored.
    • Take shots of relevant screens, save them appropriately, and link them into the blog text.
    • Obtain other relevant graphics and treat them in a manner similar to screen shots.
    • Develop any appropriate gists to illustrate code and save them at Github. Include them in the post authoring as I proceed.
  • Copy and paste the finished blog post to the blogging website's editor.
  • Tweak graphics if necessary. Tweaks are generally size considerations.
  • Make a final review
  • Publish the blog

MarkdownPad 2

For a Markdown editor I currently use MarkdownPad 2 Professional. Here's a screen shot of MarkdownPad 2. There's nothing particularly special about the User Interface:

MarkdownPad Screen

  • The left panel shows the original Markdown you enter as you compose the blog.
  • The right panel shows the reformatted text produced by MarkdownPad 2 from your original text1.

Flavors of Markdown

MarkdownPad 2 supports six "flavors" of Markdown2:

  • Markdown
  • Markdown (Classic)
  • Markdown (Extra)
  • Github Flavored Markdown (GFM)
  • Github Flavored Markdown (Offline)
  • Commonmark

Each flavor exposes features unique to the particular implementation of Markdown indicated. For example, GFM supports an extensive selection of emoji tags. Markdown Extra adds support for simplified table construction, Abbreviations (Tool Tips), and Definition Lists (but has no emoji support).

For blogging, where I have relatively full control of the formatting and CSS, I use Markdown Extra, to take advantage of the significant capabilities of the flavor. On the other hand, if I'm composing for a Github Readme I'll stay with one of the Github flavors to avoid using features not available on Github.

You'll want to choose your flavor based on individual needs and preferences. The flavor is easily changed in the Options dialog.

Some Caveats Before You Buy MarkdownPad 2

Some MarkdownPad 2 users complain that no further development has taken place for a number of years while others characterize MarkdownPad 2 as "abandoned." I personally have had excellent success with the product while also noting that development has not advanced for several years. The developer, Evan Wondrasek is currently a Software Development Manager at Amazon. The website remains operational and still accepts payments and so far as I can tell responds by providing a license key to unlock the full feature set. The website also features a fairly extensive FAQ and Support Forum.

I did have one technical issue with the Github Flavored Markdown related to GFM Online Mode and SSL/TLS channel crashes. It was easily solved by this Registry Hack.

All of this being said, I still personally like MarkdownPad 2 and will continue to use it for blogging as well as other tasks that require the preparation of HTML text.

Blogger

MarkdownPad 2 creates some of the cleanest HTML and CSS I have seen in some time. Unfortunately, Google's Blogger has some of the most complex and obfuscated code I have seen.

This matters for a couple of reasons:

  • Blogger templates do not produce very aesthetically pleasing formatting. They have a lot of pretty pictures and colors chosen by a graphic artist, but that's not what I'm creating. I want people to easily see what I've written and gain some insights thereby.
  • Changing the formatting is done using CSS, the same as it is for all HTML that is displayed by a browser. So the only way to improve the formatting is to change the CSS used.
  • Determining the CSS, while fairly easy, is complicated by the Google template structure that makes the specification of Selectors somewhat less than obvious.

Template Formatting

A number of blog entries and even Google's help screens describe various ways to modify a template's CSS. I wasn't able to find any that worked for me. Instead, here's what I did:

  • Determine the appropriate selectors for my desired modification.
  • Update the template CSS to my desired settings.

Depending on the extent of your modifications updating the template CSS can be a time-consuming and frustrating exercise. The good news is that you only have to do it once; after that, the template remains for all your blog posts that use that template. The only time you'll have to reenter the world of Google templates is if you decide to make changes to the template. Keep a couple of things in mind as your work, however:

  • Changing the template affects all posts that use that template, past, present and future.these are global changes.
  • You will probably be wise to back up your modified template as you work so unsuccessful changes can be easily removed by restoring the backup copy. (There are menu selections for this in the template customization dropdown.)

If you are new or insecure about CSS or HTML, now might be a good time to sharpen your skill set in those areas. There are a number of good tutorial and reference sources on the Internet:

W3 Schools
This site features a number of courses covering various languages and protocols. The reference page on CSS Selectors is particularly useful in the present context.
MDN Web Docs
Another high-quality site that features a number of useful tutorials and reference pages. Use the MDN Web Docs Home Page to access all of its offerings.
Browser Development Tools
Modern browsers feature powerful suites of developer tools. The exact nature and functionality of each suite varies somewhat from browser to browser, although they all enable you to examine or modify a web page once it has been loaded into the browser. The MDN Article What Are Browser Developer Tools? contains a good overview of browser tools along with extensive links to documentation specific to particular browsers.
Overview of Updating a Blogger Template

The following steps assume some familiarity with CSS and Browser Development Tools. If you're new to either of these technologies, you may want to sharpen your skills using one or more of the previously mentioned resources.

Determine the CSS

A good starting point for Markdown CSS can be obtained from the MarkdownPad 2 style sheets. In the options dialog choose the CSS Style Sheet that approximates your desired result. Tools==>Options then Style Sheets button. Then export your document using File==>Export==>Export HTML. Open the resulting file in a text editor to access a full set of CSS styles that correspond to the option you chose. Here's a sample of what you might find:

/* BODY
=============================================================================*/

body {
  font-family: Helvetica, arial, freesans, clean, sans-serif;
  font-size: 14px;
  line-height: 1.6;
  color: #333;
  background-color: #fff;
  padding: 20px;
  max-width: 960px;
  margin: 0 auto;
}

body>*:first-child {
  margin-top: 0 !important;
}

body>*:last-child {
  margin-bottom: 0 !important;
}

/* BLOCKS
=============================================================================*/

p, blockquote, ul, ol, dl, table, pre {
  margin: 15px 0;
}

/* HEADERS
=============================================================================*/

h1, h2, h3, h4, h5, h6 {
  margin: 20px 0 10px;
  padding: 0;
  font-weight: bold;
  -webkit-font-smoothing: antialiased;
}

h1 tt, h1 code, h2 tt, h2 code, h3 tt, h3 code, h4 tt, h4 code, h5 tt, h5 code, h6 tt, h6 code {
  font-size: inherit;
}

h1 {
  font-size: 28px;
  color: #000;
}

h2 {
  font-size: 24px;
  border-bottom: 1px solid #ccc;
  color: #000;
}

h3 {
  font-size: 18px;
}

h4 {
  font-size: 16px;
}

h5 {
  font-size: 14px;
}

h6 {
  color: #777;
  font-size: 14px;
}

body>h2:first-child, body>h1:first-child, body>h1:first-child+h2, body>h3:first-child, body>h4:first-child, body>h5:first-child, body>h6:first-child {
  margin-top: 0;
  padding-top: 0;
}

a:first-child h1, a:first-child h2, a:first-child h3, a:first-child h4, a:first-child h5, a:first-child h6 {
  margin-top: 0;
  padding-top: 0;
}

h1+p, h2+p, h3+p, h4+p, h5+p, h6+p {
  margin-top: 10px;
}

/* LINKS
=============================================================================*/

a {
  color: #4183C4;
  text-decoration: none;
}

a:hover {
  text-decoration: underline;
}
Determine the Template Selectors

Selectors are the key to applying CSS Styles. Determining the correct selector to use can be daunting given the extensive and chaotic nature of Google Templates. Here's a quick overview of how to make that task easier:

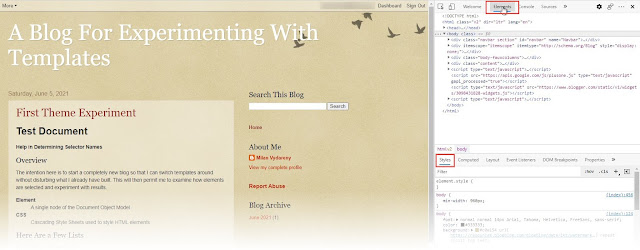
  1. Open a blog entry that uses the template you want to modify. Then click F12 to open the Developer Tools for the page. Click theElements tab and the Styles tab. You should see something similar to the following: Open Developer Tools
  2. Click the Element Selector icon in the upper left corner of the Developer Tools panel. Activate Element Selector
  3. Identify the container for your blog post by using your mouse to hover over various parts of the blog post page. The Developer Tools will highlight various elements as you pass the mouse over them. Eventually you will discover a container that includes all of your blog post but excludes all of the boiler-plate that generally surrounds a blog page. You generally only want to modify the blog post, not the boiler-plate, although you may also modify the boiler-plate using this technique if you want to. When you finally identify the container, note the selector suggested in the properties box in the upper left hand corner.
    Identify Blog Container
  4. If you also click on the container you have identifed, this will highlight the Element entry in the Developer Tools Panel. Clicking on this Element entry will also yield similar information to what you have already seen.
    Identify Blog Container Alternate
Update the Template HTML

Open the Blogger Main Menu. Click Themes and make sure that the template you want to update is selected at the top of the page. Then from the Customize drop-down button choose Edit HTML.

Blogger Main Menu

Make the desired CSS changes in the HTML that is displayed. In this example, the CSS for the template begins around Line 175 with the Content comment. I began adding my changes following the original Content section. Here's what a portion of the finished changes look like. My changes begin with the Body comment. Also note that every selector has been changed to reflect the selector I determined earlier. In this case, all of my CSS changes were directed to elements having the .content-inner class, so each and every selection begins with .content-inner.

/* Content
----------------------------------------------- */
body {
  font: $(body.font);
  color: $(body.text.color);
  background: $(body.background);
  padding: 0 $(content.shadow.spread) $(content.shadow.spread) $(content.shadow.spread);
  $(body.background.override)
}

html body $(page.width.selector) {
  min-width: 0;
  max-width: 100%;
  width: $(page.width);
}

body, p {
    margin: 25px 0;
}

h2 {
  font-size: 22px;
}

a:link {
  text-decoration:none;
  color: $(link.color);
}

a:visited {
  text-decoration:none;
  color: $(link.visited.color);
}

a:hover {
  text-decoration:underline;
  color: $(link.hover.color);
}

.body-fauxcolumn-outer .fauxcolumn-inner {
  background: transparent $(body.background.gradient.tile) repeat scroll top left;
  _background-image: none;
}

.body-fauxcolumn-outer .cap-top {
  position: absolute;
  z-index: 1;
  height: 400px;
  width: 100%;
}

.body-fauxcolumn-outer .cap-top .cap-left {
  width: 100%;
  background: transparent $(body.background.gradient.cap) repeat-x scroll top left;
  _background-image: none;
}

.content-outer {
  -moz-box-shadow: 0 0 $(content.shadow.spread) rgba(0, 0, 0, .15);
  -webkit-box-shadow: 0 0 $(content.shadow.spread.webkit) rgba(0, 0, 0, .15);
  -goog-ms-box-shadow: 0 0 $(content.shadow.spread.ie) #333333;
  box-shadow: 0 0 $(content.shadow.spread) rgba(0, 0, 0, .15);

  margin-bottom: 1px;
}

.content-inner {
  padding: $(content.padding) $(content.padding.horizontal);
}

/* BODY
=============================================================================*/

.content-inner body>*:first-child {
  margin-top: 0 !important;
}

.content-inner body>*:last-child {
  margin-bottom: 0 !important;
}

/* BLOCKS
=============================================================================*/

.content-inner p, .content-inner blockquote, .content-inner ul, .content-inner ol, .content-inner dl, .content-inner table, .content-inner pre {
    margin: 15px 0;
}

/* HEADERS
=============================================================================*/

.content-inner h1, .content-inner h2, .content-inner h3, .content-inner h4, .content-inner h5, .content-inner h6 {
    margin: 20px 0 10px;
    padding: 0;
    font-weight: bold;
    -webkit-font-smoothing: antialiased;
}

.content-inner h1 tt, .content-inner h1 code, .content-inner h2 tt, .content-inner h2 code, .content-inner h3 tt, .content-inner h3 code, .content-inner h4 tt, .content-inner h4 code, .content-inner h5 tt, .content-inner h5 code, .content-inner h6 tt, .content-inner h6 code {
  font-size: inherit;
}

.content-inner h1 {
  font-size: 28px;
  color: #000;
}

.content-inner h2 {
  font-size: 24px;
  border-bottom: 1px solid #ccc;
  color: #000;
}

.content-inner h3 {
  font-size: 18px;
}

.content-inner h4 {
  font-size: 16px;
}

.content-inner h5 {
  font-size: 14px;
}

.content-inner h6 {
  color: #777;
  font-size: 14px;
}

body>.content-inner h2:first-child, body>.content-inner h1:first-child, body>.content-inner h1:first-child+h2, body>.content-inner h3:first-child, body>.content-inner h4:first-child, body>.content-inner h5:first-child, body>.content-inner h6:first-child {
  margin-top: 0;
  padding-top: 0;
}

.content-inner a:first-child h1, .content-inner a:first-child h2, .content-inner a:first-child h3, .content-inner a:first-child h4, .content-inner a:first-child h5, .content-inner a:first-child h6 {
  margin-top: 0;
  padding-top: 0;
}

.content-inner h1+p, .content-inner h2+p, .content-inner h3+p, .content-inner h4+p, .content-inner h5+p, .content-inner h6+p {
  margin-top: 10px;
}

/* LINKS
=============================================================================*/

When you have finished making your changes be sure to click the Save icon at the top right of the screen. You may then view the results of your changes by using the Blogger Preview function. However, be aware that once you save the template, the changes will affect every blog post that uses it. After viewing your changes, you can quickly make any modifications or corrections you might discover.

Once you get the template the way you want it, you shouldn't have to go through this exercise again. Making extensive changes can take a half day or more of your time depending on your existing fluency and skill set. If you face a learning curve, it will potentially take even longer. Sometimes it might be better to approach the changes incrementally to avoid making massive mistakes that only have to be redone correctly. Testing small changes will confirm your skills and give you confidence to proceed.

Posting Blog Text

To publish a blog, open the Blogger on-line editor. Switch to the HTML view by choosing HTML View from the tool bar. It's the very far left button. Then:

  • Select everything in the editor window and delete it.
  • In MarkdownPad 2 main menu choose Edit==>Copy Document at HTML. This will copy the HTML but not any of the CSS (which you have already placed in the template).
  • Paste the document into the Blogger on-line document editor.
  • Click Preview to see the completed blog entry.

If you're happy with the blog entry, click the Blogger Publish button at the top right of the screen.

Alternatives

There are a number of alternatives to MarkdownPad 2 suggested by various users. Some of the suggestions follow, although I haven't tried them all. I leave it to the reader to determine what the best path for composing Blog entries is given their own particular circumstances.

Conclusion

Blog prepration is greatly eased by using a Markdown editor to prepare the blog text. The choice of editor depends on the blogger's own style, objectives and technical skills. One-size-fits-all is not apropos. Modifying your blog host's template to suit your own preferences and needs can take a substantial effort and involve a heavy learning lift, although it is generally only required one time as you establish your blog.

Aside from entertainment, the overall objective of any blog is to communicate useful information to its audience. Facilitating that communication in a clear, effective manner can be enhanced by bloggers who find ways to reduce or eliminate the time-wasting, error-prone drudgery involved in so much of the Internet's development. Using an appropriate Markdown editor may be one way to eliminate wasted effort thereby allowing bloggers to focus on what matters—effective communication.

Footnotes


  1. Final formatting in the blog depends on the CSS your blog software employs, so the final output may not be exactly what you see in the MarkdownPad 2 preview pane. But it will likely be very close. 

  2. Some of the features of Markdown Pad 2 are only available in the Professional (Paid) version. See MarkdownPan 2 Feature Comparison for details. The cost of the Professional edition is a relatively modest $15, but see the discussion about MarkdownPad 2 Caveats

Sunday, May 30, 2021

Android USB Debugging With RAD Studio and Hyper-V

Android USB Debugging With RAD Studio and Hyper-V

A Step by Step Guide

Overview

I use Microsoft's Hyper-V running one or more instances of a Windows 10 Guest as a development environment. I was recently working some tutorial from the Embrcadero Docwiki involving Livebindings and got to one that used an Android device as a target. The tutorial was trivial, but I suddenly realized I had no idea of how to debug an Android device over USB from a Hyper-V Guest. If you simply connect the device to your PC using an available USB port RAD Studio running in a Guest OS will not be able to "see" the device or connect to it. After a considerable amount of Googling I discovered a relatively easy way to do this.

The solution involves implementing device pass-through, which is a way of passing control of the device from the Host OS to the Guest OS thereby allowing the Guest OS to work with the device as though it were physically connected to the Guest instance.

There are a lot of moving parts to the solution but none of them are particularly difficult. For many of them, if you make the correct settings once you won't have to change or remake them in the future.

What follows is a step-by-step guide to my solution to this problem. There may be other solutions that involve specialized software, messaging and other gymnastics, but I have not explored those. Also, this solution works for my particular stack of hardware and software but may require appropriate modification if your stack differs. However, the basic principles should be applicable to all supported hardware and software.

Let's get started.

The Objective

To enable to run RAD Studio on a Guest Instance of a Hyper-V Host and debug Android applications.

Hardware

There is nothing particularly special about my hardware. My workstation is definitely on the vintage side, but it still serves me well so I see no need to replace it just yet. Here's the short list:

Dell Precision T3500
This is a venerable old tower workstation with an Intel Xeon CPU, 4 cores, 8 logical logical processors, 24 gigabytes of RAM and about 2 terabytes of conventional disk space (not SSD).
Samsung Galaxy S9+ Phone
Given to me by a friend, this is a garden-variety Samsung.
Samsung Galaxy S10+ Phone
Also a gift from the same friend.

Software

I don't use pirated or unlicensed software. Here's a partial list of relevant software.

Windows 10 Professional (Host)
This is the Host OS, fully patched and updated with Microsoft's current maintenance running Hyper-V hypervisor.
Windows 10 Professional (Guest)
This is one Guest OS. It is also fully patched and updated with current Microsoft maintenance. It runs as a virtual instance.
RAD Studio 10.4.2
the RAD Studio we all know and love, fully patched with current Embarcadero maintenance. No special components are needed for implementing device pass-through.

Terminology

In this blog post I use the following terms:

Host
This refers to the OS that runs when you boot the workstation. It runs Hyper-V and controls the other OS instances that run in the system.
Guest
This refers to an OS that runs as a virtual machine under the control of the Host Hyper-V. Some people prefer the term VM rather than Guest, but I use the latter.
ADB
This acronym stands for Android Debug and generally refers to the driver or bridge that permits Android debugging over USB. We'll see this used specifically when we get to driver installation later in this blog.

Driver Installation

Drivers are somewhat tricky. Generally, you need to follow two steps to prepare your system with ADB drivers.

  1. Obtain the driver for your particular mobile device
  2. Install the driver on your system.

Google provides a list of OEM USB drivers at Install OEM USB Drivers. Scroll down the page for an extensive list of links to OEM drivers. In my case, since both my mobile devices are Samsung phones, I chose the Samsung link.

Warning: The instructions about installing USB drivers provided by Google on the page are incorrect, at least for Samsung drivers. They may be correct for drivers other than Samsung, but I have no way of determining that.

Samsung provides a downloadable .exe that installs its drivers. You download the file and run it. That's the end of it. There's no messing with the Device Manager required, just Download and Run.

For both the Host and Guest the results of installing Samsung drivers is not visible until you actually connect a Samsung device using a USB cable and enable the device Developer Options. That comes later and you will eventually see what has happened.

For OEM's other than Samsung you may have to follow the Device Manager method Google describes; it's up to you to determine the correct way to install drivers for your devices.

Host Driver

Samsung drivers must be installed on your host machine. Download the drivers from the Samsung Driver site and execute it.

Guest Driver

The same drivers must be installed on your guest machine as well. Sign in to your guest machine, download the file, and execute it.

Bonus: USBDeview

Sometimes it is difficult to manage USB drivers on a Windows system. To help you manage USB drivers, try the free utility from NirSoft called USBDeview. You can download a free copy at USBDeview v.3.01. The utility requires no installation. Download the .zip file, unzip it and execute the utility.
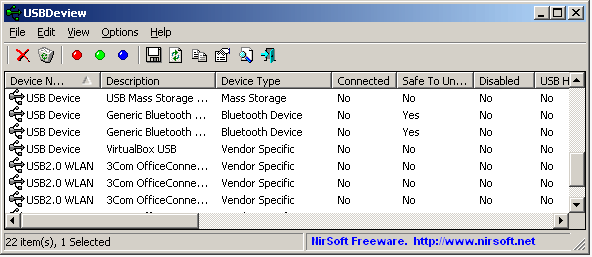
USBDeview Screen Shot

Hyper-V Settings

Hyper-V has a number of settings that determine its behavior. We're only concerned with one setting for this project. To check this setting open the Hyper-V Manager.
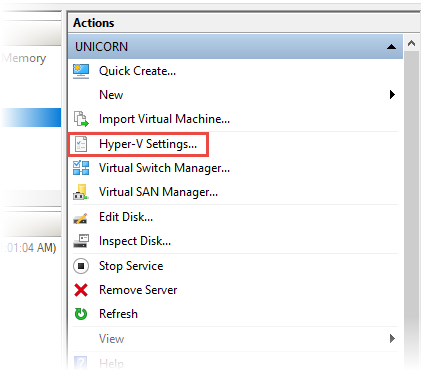
Hyper-V Manager

Hyper-V Host Setting

In the Actions panel choose Hyper-V Settings.... This will open the settings dialog for the Host. In the Settings Dialog left hand selector panel under Server choose Enhanced Session Mode Policy. This will display the Enhanced Session Mode Policy setting in the adjacent panel. Make sure that the policy is checked to Allow enhanced session mode. The policy is enabled by default in all of my Hyper-V instances, so this is just insurance that the policy is enabled and you shouldn't have to change it.

Hyper-V Enhanced Session Mode Policy.

Guest Setting

There is no corresponding Guest setting in the Hyper-V Manager for Enhanced Session Mode Policy.

Group Policy Settings

Group Policy turned out to be the most difficult part of the solution for me. Not because I don't understand Group Policy, but because the required settings were only mentioned in one place that I was able to locate in my search.

General Comments

Group Policy can be frustrating. First of all, it tends to be confusing because of the sheer number of possible settings and because many settings have names that are identical or similar to other settings in a different part of the policy tree. Some care is required to ensure that you have indeed located the desired policy.

Further complicating Group Policy is the fact that policy changes do not take effect immediately upon change. Besides saving the policy you must generally update the policy on the desired machine, most typically by using a command:

gpupdate /force

In some cases you must reboot the OS to get the changed policy to take effect.

If you are unsure as to what policies are actually applied to your machine you can use the following command to generate an interactive report you can display in your browser.

gpresult /h <targetfile.html>

where targetfile.html is the fully qualified name of the file to receive the output report. The file should by an html file that you can then display in your browser. It's complexities are beyond the scope of this current discussion.

In all the discussion that follows, the Group Policy Editor is launched by pressing Win+R (for Run) and entering the following:

gpedit.msc

Local Group Policy Editor.

Note that this is the Local Group Policy Editor. Also, there are two main sections to the Local Computer Policy Tree:

  • Computer Configuration
  • User Configuration

Each of these has identically named sub-items. Be careful to choose the correct sub-item when editing Local Group Policy.

Host Group Policy Setting

The Host Group Policy requires a change to one setting. Launch while logged in to your Host machine, launch the Local Group Policy Editor and navigate to

  • Computer configuration
  • Administrative Templates
  • Windows Components
  • Remote Desktop Services
  • Remote Desktop Connection Client
  • RemoteFX USB Device Redirection

There is only one policy in this sub-sub-item. Select it. Under Setting in the right hand panel select Allow RDP redirection of other supported RemoteFX USB devices from this computer You should see:
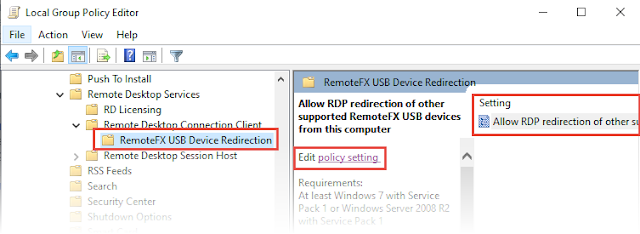
RemoteFX USB Device Redirection.

Click policy setting to open the policy setting dialog.

Policy Dialog.

Enable the policy by clicking the Enabled radio button. Also, select the desired Access Rights. Generally this will be Administrators and Users but you may also limit this to Administrators only if you desire. Choose your selection from the dropdown.

After making your desired changes click Apply then OK to exit the dialog. Close the Group Policy editor and run gpupdate /force to apply the policy. Note however that you must also reboot your computer to make this policy take effect. You can wait to reboot until after you've made a similar policy setting for the Guest.

Guest Group Policy Setting

The Guest Group Policy setting is similar to the Host Group Policy Setting, except you must log in to your Guest instance to make the change. To get started, log in to your Guest instance and launch the Local Group Policy Editor by pressing Win+R, typing gpedit.msc and pressing Enter. Then navigate to:

  • Computer Configuration
  • Administrative Templates
  • Windows Components
  • Remote Desktop Services
  • Remote Desktop Session Host
  • Device and Resource Redirection

From the right panel under Setting select Do not allow supported Plug and Play device redirection. Your should see the following display:

Device and Resource Redirection.

Click policy setting to display the policy setting dialog:

Supported Plug and Play device redirection Policy Setting.

Disable the policy by clicking the Disabled radio button. Then Click Apply and Close. Close the Local Group Policy Editor and run gpupdate /force from a command box.

Finally, reboot your Guest instance. After rebooting, log off the Guest.

Back on the Host system, reboot the Host.

Mobile Device Preparation

Preparation of the device follows the customary procedures you may already know and understand.

Cable Connection

Connect the device (typically a phone) to the Host using a USB cable.

Enabling Developer Options

Enable Developer Options by navigating to

  • Settings
  • About Phone
  • Software Information

Tap Build number seven times. As you do this, the phone will display a toast indicating you're about to enable Developer Options. You may be asked for your Pin before the options are enabled.

Back up two levels to Settings and scroll to the very end. Observe that Developer options now appears at the end of the list. Click Developer options to set options. Initially, only two options are of great interest:

Stay awake
Turn this option on to prevent your phone from sleeping while charging. This is a convenience to you as a developer to keep the phone active as you work debugging.
USB Debugging
You must turn this option on to enable USB debugging. When you turn USB Debugging on a prompt will appear requesting permission. Choose OK to dismiss the prompt, turn on USB Debugging and proceed.

This completes preparing the device for USB debugging.

Checking Host Device Manager

You may want to examine your Host Device Manager to be certain that you have made correct changes to allow device pass-through. To do this, type Device Manager in the Windows search box and launch the Device Manager. You should see entries similar to the following:
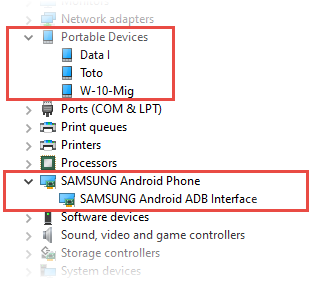
Host Device Manager

Besides the expected entry in Portable Devices (in my case Toto is the name of the phone after Dorothy's dog in the L. Frank Baum children's story), you will find the entry Samsung Android Phone and its accompanying Samsung Android ADB Interface. These last two items indicate that your Host is correctly configured for device pass-through and recognizes the phone as being eligible for debugging.

Note that this illustration is for my particular hardware/software stack. If you are working with a device from another vendor, Google for example, the results will probably appear different from mine, but the basic idea will still prevail. You may have to hunt a bit until you find the corresponding Device Manager entries for your device.

Connecting to the Hyper-V Guest

Before connecting to your Hyper-V Guest instance there are some Session Settings to consider. Launch the Hyper-V Manager and choose Edit Session Settings... If you are currently logged on to your Guest you will have to log off before you can modify Session Settings.

Session Settings

When the Session Settings dialog appears choose Show Options to display the Options Dialog:
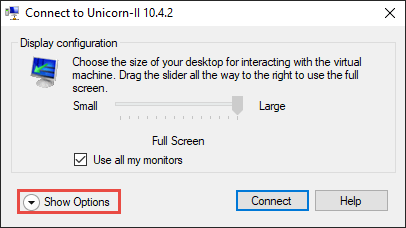
Session Settings

When the Session Options Dialog opens, choose the Local Resources tab and then the More button.
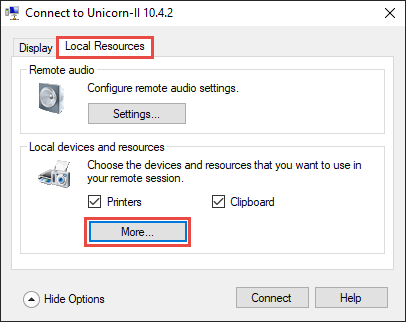
Session Options Dialog

Scroll down the Local Devices and Resources list. Check the entries related to the device you want to use in your Guest Session. In my case, I checked the box for Toto (my phone) and also Samsung Android, which is the pass-through entry to permit USB debugging.
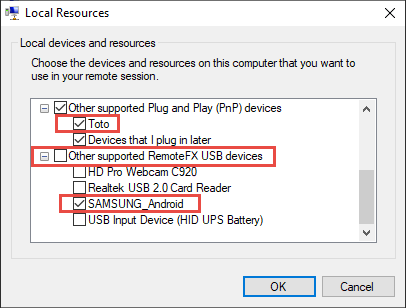
Local Resources

Connect to Hyper-V Guest Instance

After choosing the appropriate settings, connecting to the Guest instance proceeds normally. Click OK and then Connect to connect to the Guest instance.

Checking Guest Device Manager

After logging on to the Guest Instance you can check the presence of the pass-through device by opening the Guest Device Manager. After opening the Device Manager you should be able to find entries for your device similar to the following:
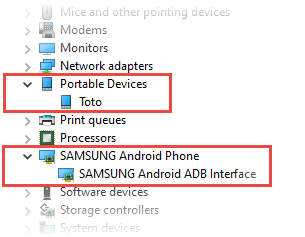
Guest Device Manager

Start RAD Studio

The moment we've all been waiting for has now arrived. In your Guest Instance, launch RAD Studio.

RAD Studio Requirements

The requirements for RAD Studio are what you'd expect:
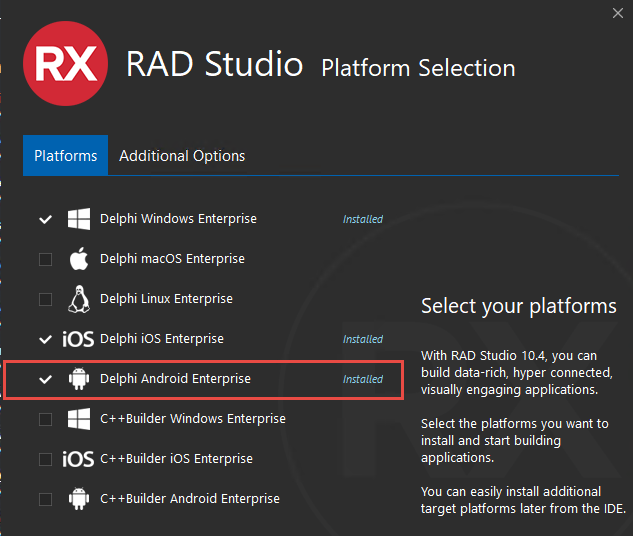
RAD Studio Platform Selection

You must at least have the Android Platform installed in your RAD Studio configuration.

RAD Studio Project Settings

To debug an Android application, you of course must have an Android target specified. In the example case, I was using the trivial Livebindings tutorial material from the Embarcadero Docwiki. Around the twelfth tutorial or thereabouts, the tutorial targeted an Android device.
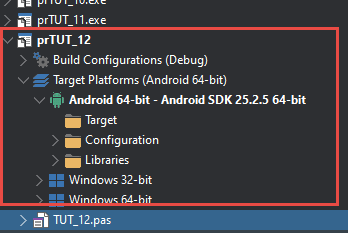
Livebindings Tutorial 12

Using Refresh to Populate a Target Device

Notice, however, that the Target devices is not yet specified. To enable RAD Studio to recognize your target device right click Target and choose Refresh from the context menu that appears. (It's the only option.)
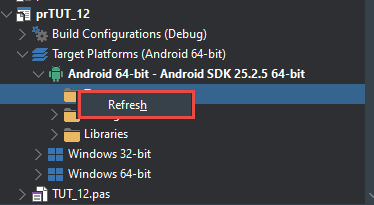
Refreshing the Target Device

At this point your device will probably ask for permission to allow USB debugging. Respond in the affirmative and proceed.
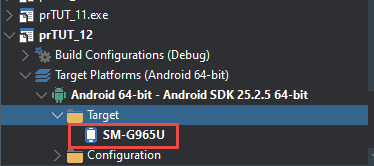
Target Device Identified

We finally arrive at the objective of this rather long and tedious exercise. You can now proceed with normal USB debugging of your application on the USB tethered device.

Congratulations!

Conclusion

Although there are many settings to be made in a variety of places, none are particularly difficult if you follow a plan and make your settings carefully. Checking the Device Manager along the way, as we have done here, will help isolate any errors or difficulties you may have encountered.

Further, most settings are persistent, meaning you only have to make them once and they'll "stick" so the next time you need to test an Android device from a Hyper-V Guest you won't have to go through the same obstacle course again.

If you're like me, when you're done with a testing session, you'll disconnect your phone and turn Developer Options off. The next time you want to start a debugging session you'll have to turn Developer Options on again (tap... tap... tap... seven times!) However, the remaining settings will probably remain available without further intervention unless you change devices or need to change an option setting. So ongoing, trouble and difficulty is minimized.

Thanks for reading this long and involved blog. I hope it provides an easy path to enable your Android USB Debugging from a Hyper-V Guest.

As always, comments and suggestions are welcome.

Sunday, April 4, 2021

TMemoLines and FileStream

Saving TMemoLines to a Logfile

Some Discoveries About Linebreaks

Summary

A small sample program illustrating this is available for download or cloning at GitHub:

SavingMemoLines

While attempting to save multiple groups of lines from a TMemo component, each new group appended to a log file, I expected each new group of lines saved to begin on a new line. After all, TStrings has a TrailingLineBreak option that should ensure that each group of lines ends with an appropriate Linebreak.

Instead, each new group of lines immediately followed the preceding group without any sort of delimiter, Linebreak or otherwise.

A little examination revealed that the TrailingLinebreak was not being inserted. I set out to discover why. (I was not successful in my search!)

What I Tried to Do

Sometimes during development I use a TMemo to record events, either system generated or manually entered by me. Then, I'd like to save those memo lines to a logfile for future reference. I have a small component that does all of this and also has a display option that will display the current log file in a separate window.

What I wanted to do was:

  • Assume we have a TMemo object available
  • Assume we have a full path and file name available to receive the TMemoLines content.
  • Assume we have a procedure that appends the TMemoLines to the end of the log file.
  • TStrings has a TrailingLineBreak option that when True (the default) should ensure that each series of lines ends with a line break.
  • Because each series of lines should end with a line break, when multiple insertions of lines takes place, each new group of lines should begin at the left margin.

It looks something like this:

What Actually Happened

What actually happens is for multiple insertions of lines from the memo, the first line of insertions following the first begins immediately following the end of the first insertion, thus running the two lines together.

One way to avoid this is to ensure that lines in the memo always end with a trailing line break. This means that if you're entering lines manually, you must remember to insert the trailing line break yourself. This might be acceptable unless the lines you're saving are generated by software that doesn't include the trailing line break. Overall, this is not a completely reliable solution and one that seems kind of specious given the fact that TStrings includes a property especially for that purpose.

Why It Happened

I wasn't able to actually pinpoint the reason by examining the Delphi VCL source code. It seems to be related to the fact that the TStrings of the TMemo are really TMemoLines, descended from TStrings and in the process the Text property is overridden to a method that does not examine the TrailingLinebreak option.

If somebody can figure out what happened to the Text property, I'd be interested to hear the explanation.

My Workaround

My workaround is fairly simple.

  • Set up a TStringList as a work area
  • Use MyStringList.Assign(TMemo.Lines) to place the TMemolines in the work StringList.
  • Continue from there using the work StringList, which results in the Text property honoring the TrailingLineBreak option.

Conclusion

Still kind of aggravating, but the workaround is easy to accomplish and given the infrequent use of most log files doesn't result in a lot of unnecessary overhead.

And so, on to the next problem.

Thursday, January 7, 2021

A Delphi Windows Explorer Context Menu Extension to Create Dated Folders

ShellExtDatedFolder

A Delphi Windows Explorer Context Menu Extension to Create Dated Folders

Genesis

Talking with a colleague he expressed a need for a way to easily create new folders that are named using today's date. I responded that it should be a piece of cake. I was very wrong. While it is possible to create new folders in a Windows Shell with but a single entry or two in the System Registry, you can't control the date format easily because of differences in localization. You really need some code to achieve your ends.

That started me on the path to learning about Windows Context Menu Extensions, that are implemented using COM. That, of course, meant I had to learn something about COM. The whole process was lengthy, frustrating, but also rewarding. The results of my explorations can be found in the associated GitHub project (see link below.)

Obtaining the Source Code

The project source code can be downloaded as a .zip file or cloned as a Git project from ShellExtDatedFolder. (GitHub)

Objectives

Here's what I hoped to accomplish. Most of this is a learning path, something I really enjoy doing.

  1. Learn how to develop COM Servers (which is what MS Shell Extensions are)
  2. Learn the specific requirements for various Explorer plugins
  3. Study and dissect the Marco Cantu and Embarcadero examples
  4. Learn a little about the C++ implementation of this
  5. Develop a Windows Explorer Context Menu Extension that creates a new folder named using the current system date. This is a convenience and accuracy improvement for the user who needs to repeatedly create such folders as a means of organizing quantities of individual files by date.

First Steps

  1. Establish repo.
  2. Move existing Cantu and Embarcadro examples into the Repo.
  3. Restructure the project libraries to facilitate easy study and analysis.
  4. Perform code analysis. Code analysis consists of two major activities:
    • Read existing code and research all unknown APIs, structures and related Microsoft documentation.
    • Comment the existing code. Commenting code strengthens understanding and cements what was learned from research. By commenting, I mean, almost every line and in the case of complex operations, paragraphs of comments associated with the methods, classes or other parts of the code.
  5. Using what was learned during the code analysis, implement a Context Menu that creates a folder that includes a name with the current date.

The ShellExtDatedFolder Project Group

  • All projects in the project group are Delphi projects, produced with RAD Studio Enterprise 10.4.
  • All code is heavily commented. This enables the code to be used as a learning tool.
  • All code is contained in this project group. There is one project in the project group:

ZNewFolder Project

Downloading the project code will permit examination of the actual code along with the code comments. The code comments will clarify much of what may be ambiguous here.

Overview

The project builds a COM .dll that populates a Shell Context Menu Extension with a single additional menu item, Zilch Dated Folder. The menu item is only displayed when a right mouse click is made in a folder background or folder tree folder. When the user selects the item, a new folder is created within the selected folder named Zilch-yyyy-mm-dd where yyyy-mm-dd is replaced by the current system date.

Implementation

A standard, lightweight COM object was created using the appropriate Delphi Wizard. The TZNewFolderExt CoClass was created by the Wizard. Microsoft Shell Extensions for Context Menus require the implementation of two Interfaces.

IShellExtInit (Interface)

IShellExtInit has a single method, Initialize. Initialize is called by the Shell after the CoClass is instantiated. It passes three values that can be utilized by the CoClass during later methods:

pidlFolder
is a PItemIDList that contains information about the folder container that was right-clicked.
lpdobj
is a pointer to the interface IDataObject that contains a list of all objects in the folder that was right-clicked.
hkeyProgID
is a Registry Key Handle HKEY to the program.

Of these, only pidlFolder is of current interest. From it is extracted the full file path to the folder that will receive the newly created folder. This information is saved as a string in a CoClass property.

IContextMenu (Interface)

IContextMenu has three methods:

QueryContextMenu
is used to specify the desired menu item position and text.
GetCommandString
is optional. It is used to specify status bar help text and canonical names of verbs in Windows XP and earlier versions of Windows.
InvokeCommand
is invoked when the user actually chooses (clicks) the menu item it supports.

Registration

An additional class, TZNewFolderExtFactory, was also added that descends from TComObjectFactory. This permits the extension of the UpdateRegistry procedure to include three additional System Registry keys to support Context Menu Extensions.

Installation

In all cases, installation may require elevated authorization. Running as Administrator, either when using the cmd window or the installation file should be sufficient to achieve correct installation.

Installation can be manually achieved by copying the ZNewFolder.dll to an appropriate folder and then using RegSvr32.exe (a Microsoft program) to register the COM server. The registration process handles all necessary System Registry modifications. RegSvr32 can also be used to uninstall the Com server using the -u switch.

Also included is an installation file created using DeployMaster, an inexpensive installation package builder available from the DeployMaster website. Deploymaster also provides an uninstall function.

References

I found a number of useful references while working on this. Here are some I found useful.

Component Object Model (COM)
Microsoft Documentation
The Component Object Model documentation portal page. If you have time and are trying to learn about COM a quick read of this documentation (all pages) might be what you need. It's long, and assumes knowledge of C++, so it's not easy reading.
Developing COM-Based Applications Index
Embarcadero DocWiki
The COM development portal page. Provides information specific to Delphi. This is also long but since it has information devoted to Delphi it may prove easier to digest.
The Complete Idiot's Guide to Writing Shell Extensions - Index
Idiot's Guide
An index of all the articles in the Idiot's Guide Since the Idiot's Guide series has become quite large, here is an index of all the articles that gives a quick blurb about each one, so you can quickly find the articles that interest you.
Unfortunately, this suffers from two problems:
  • The content is somewhat dated, although it still contains much valuable information.
  • It is not Delphi-centric. It is written for C++ programmers so if your strictly interested in Delphi this is probably not your cup of tea.
Creating Shortcut Menu Handlers
Microsoft Documentation
A significant and lengthy discussion of Shortcut Menu Handlers. Difficult to understand without a lot of background understanding, but very important to do so.
Shortcut menu handlers, also known as context menu handlers or verb handlers, are a type of file type handler. Like all such handlers, they are in-process Component Object Model (COM) objects implemented as DLLs.
Writing a Windows Shell Extension
Marco Cantù
Delphi Product Manager Marco Cantù's blog post. Also links to a video. This focuses on file operations and COM rather than Menu Shortcuts. Still contains lots of general information useful to understand Shell development.

Important Caveats

Bitness

If you are running a 32-bit Shell, you must register and use the 32-bit version of the Com server. On a 64-bit system you must register and use the 64-bit version.

The DeployMaster installation program contains both versions and will correctly choose and install the correct version after examining the bitness of the installation system.

Target Systems

The existing code has only been tested on a 64-bit Windows 10 Pro system, version 2009, released October 2020 and code-named 20H2. The installation program will also allow installation on Windows 7 and windows 8 machines, both 32-bit and 64-bit, as well as a variety of Windows servers, but since the code has never been tested on those configurations it is not known if it will function correctly.

Licensing

The code is licensed under the MIT license, a copy of which is included in the project and also in the source code. Copyright ©2020 –2021 by Milan Vydareny.

FireMonkey String Grid Responsive Columns

FireMonkey String Grid Responsive Columns Code to Cause Column Widths to Change When String Grids Are Resized Overview I have a FireMonke...