Sunday, March 25, 2018

Part 4 of 4—View—Using Delphi LiveBindings With TObject and TObjectList

Source Code

The source code in the form of a Delphi Project Group is available at:
The project was developed using Delphi RAD Studio Tokyo (10.2.2)

The README file contains additional useful information.

VIEW Details

This is the simplest part of the demo. This is in keeping with our objectives of making the VIEW as trivial a possible to facilitate testing. It also results in a very clean separation of concerns, effectively removing all data manipulations from the VIEW. The use of LiveBindings further isolates the VIEW from other parts of the application.

Create and Destroy

The FormCreate and FormDestroy events are used to create and free the MODEL. The pointer to the MODEL is saved as a property of the form.

Binding the UI Objects to the MODEL

LiveBindings is used to connect the data elements of the MODEL to the UI objects seen by the User. The Visual LiveBindings used to accomplish this appear in the following illustration. There are no other bindings or code fragments used to display the data. The entire VIEW is handled by LiveBindings without needing any other code. (A full-sized PDF of this diagram is also to be found in the Docs folder of the Github project or can be downloaded here.)

Delphi LiveBindings Demo Visual LiveBindings Screen Shot
Delphi LiveBindings Demo Visual LiveBindings
Several things should be observed in order to achieve this result:
  • Work from the VIEW, not the MODEL. In other words, be sure you have VULBO.pas, the Form, selected in the IDE. Then invoke "Bind Visually."
  • Be sure you have specified MDULBO (your Model Unit Name) in the VIEW (VULBO) Uses clause. This will enable the Visual Designer to access the necessary TBindSource instances.
  • The Items in the Branch TListView have been customized by setting the ItemAppearance property to DynamicAppearance and adding the Item.Text1, Item.Text2 and Item.Text3 fields. This discussion does not address how that is accomplished and I assume you already know how to do that or you can find a way to learn about it.
  • For bindings that bind to ObjectList<T> properties, be sure to connect the TListView Synch property with the Asterisk (*) item of the TListBindSourceAdapter. In the diagram above, these are named MDLBO.absEmployees and MDLBO.absBranches respectively. This will permit scrolling operations on the lists to take place correctly. The remaining item, MDLBO.absCorp is not a list; it is a single object. So it cannot be synched.

Conclusion

The discussions and techniques presented here should enable a developer to utilize LiveBindings effectively with both Objects and ObjectLists for real-world development. Of course, there are endless variations to the patterns shown, but regardless of the details of any particular implementation, the fundamental principles used to manage LiveBindings with Objects and ObjectLists remain; developers who understand the fundamentals will be able to expand and adapt the fundamentals to the particular needs of their application.

If you made it this far, thanks for reading and (I hope) understanding! Part 3 is especially daunting because of the number of things that must be managed and coordinated, all of which is compounded by the severely inadequate and confusing naming conventions (if they can be called conventions at all) of LiveBindings.

When all is said and done, it is pretty cool. Enjoy!


Using Delphi LiveBindings With TObject and TObjectList<T>—Part 3 of 4—Model Details<==Previous

Part 3 of 4—Model Details—Using Delphi LiveBindings With TObject and TObjectList

Source Code

The source code in the form of a Delphi Project Group is available at:
The project was developed using Delphi RAD Studio Tokyo (10.2.2)

The README file contains additional useful information.

MODEL Details

The MODEL functions as the main mechanism to manipulate the data for the application. In the case of an application that makes use of SQL or other persistent databases, we would expect to find FireDAC components managed by this class. In the present case, we are not using any kind of database that FireDAC supports, but never-the-less our MODEL will have data objects to manage. 

The Model Is a Data Module

The file MDULBO.pas specifies the MODEL part of the system. The model is a class named TMDLBO and descends from a TDataModule class. This permits the dropping of components on the MODEL design surface.

Instantiation

Normal Delphi instantiation has been disabled for this class. As a singleton class, a different mechanism was used that hides the customary Create constructor and provides instead a function named MDLBOGet that checks to see if the class has already been instantiated. If not yet instantiated, the class is instantiated and a pointer retained for future requests. In any case, the pointer for the instantiated class is returned to the caller.

The GDLBOGet routine invokes the Create constructor as needed. During the execution of the constructor, the database class TCorp is instantiated. As we described earlier, this results in a chain of constructor calls to the various classes of the database; the final result is an instantiation of the database data along with the instantiation of the MODEL (this class.)

Pay special attention to the TMDLBO.Create constructor. When the MODEL is instantiated, a call is made to this constructor. As a singleton, this occurs only once. Note that the constructor first calls the constructor for the database classes, to instantiate the entire database class structure prior to processing anything for the MODEL class. Following this it calls the inherited Create for itself that completes the instantiation of the MODEL.


It is important that this order be maintained because the OnCreate events of the TAdapterBindSource components must be able to access the already-instantiated database classes. Since the TAdapterBindSource components are created by the inherited Create call, instantiating the database data classes prior to the call to inherited Create satisfies this requirement.

LiveBinding Objects

LiveBinding Objects and ObjectLists behave similarly to the bindings for database objects. We note that the database components connect to a TAdapterBindSource just as do Objects and ObjectLists, but that is the extent of our involvement with database components in this discussion. We are only considering Objects and ObjectLists at this time, so any further discussion will not include references to database components (FireDAC, dbExpress, etc.)

In our current application we have three data sources to consider:
  • TCorp is a single object.
  • TBranch occurs multiple times and is managed by a TObjectList<TBranch>; property of TCorp.
  • TEmployee occurs multiple times and is managed by a TObjectList<TEmployee> property of its parent TBranch.
We customarily use a TDataGeneratorAdapter to create arbitrary data for use at design time. A corresponding TAdapterBindSource is needed for each generator to allow us to use LiveBindings to connect the data sources to other components, typically display components. With that in mind, the MDULBO.pas file that contains the MDLBO class appears as follows:

MDLBO Data Module from MDULBO.pas
Values for the TCorp display components are generated by the dgCorp component. Values for the TBranch display components are generated by the dgBranches component. Finally, values for the TEmployee display components are generated by the dgEmployees component. Each of the data generator components has a corresponding TAdapterBindSource component that connects to its corresponding data generator. To force the TAdapterBindSource components to be a property of the data module, you must drop them on the form from the Tool Pallet and connect them each to the proper TDataGenerator component. If you use Visual Live Bindings to automatically create the TAdapterBindSource components, they will likely end up on the user interface Form—the VIEW. We want them as a part of the MODEL, not the VIEW, to achieve a separation of concerns. Hence, they should be manually placed to achieve our desired result.

In general, Objects and ObjectLists are connected to LiveBindings as illustrated in the following diagram (a full-sized PDF of this diagram is also to be found in the Docs folder of the Github project or can be downloaded here):

Live Bindings Using Objects diagram showing object relationships.
LiveBindings Using Objects
So far we have connected the data generators to their respective TAdapterBindSource components. Data generators are a special case, and the component contains both the generator and the TDataGeneratorAdapter needed to complete the configuration. This is the case illustrated by the rose colored combination in the diagram. Objects (goldenrod) and ObjectLists (blue) are different. The developer must provide both the data source (an Object or an ObjectList) and the developer must provide a TObjectBindSourceAdapter (goldenrod) or TListBindSourceAdapter (blue) as appropriate.

Only one of the paths to the TAdapterBindSource can be active at any given time; we begin by using the TDataGenerator to assist the design effort. But now, at run time, we are faced with replacing the design setup by the actual run-time data sources, either from a TObjectBindSourceAdapter or a TListBindSourceAdapter. This is where the Type Aliases defined in the DBLBO.pas file help. We can easily refer to CorpObjectBSWrapper, or BranchListBSWrapper, or EmployeeListBSWrapper and be confident of referencing the correct kind of components. The actual substitution of data sources (from TDataGenerator to TObject or TObjectList) takes place in the OnCreateAdapter event handler for each of the TAdapterBindSource components in the application.


In the following example, be sure to understand the different classes involved. Prior mention has been made of the draconian naming failures of LiveBindings. Refer to the previous diagram and the Type Aliases mentioned so that you understand what types are being instantiated. Examine the absCorpCreateAdapter event handler code in order to follow the following steps:


  1. You must first create a TObjectBindSourceAdapter for the TCorp instance. See the diagram above. This object behaves just like a component, but cannot be dropped on a form because of its generic nature. The code uses the Type Alias to create the object and save it as a property of the form, just as though it had been created at design time. Notice that during the create process, you must identify the specific object you're connecting, in this case the Corp instance of the TCorp class. The fact that it's a TCorp instance is inherent in the Type Alias, where TCorp is specified.
  2. After the CorpWrapper is created, it must be passed back to the TAdapterBindSource event so that creation of the TAdapterBIndSource can be completed.
These same two steps must be performed for each data source we want to connect to LiveBindings. There is an OnCreate event handler for each of the three data sources we are working with. Note that for Branches and Employees we specify the TObjectList properties as the data source rather than just a single object.

You should now also understand why instantiation of the actual data objects must precede the creation of the LiveBinding objects themselves; the data objects are referenced by the LiveBinding objects and hence must be available at the time the OnCreate event handler fires.

Handling Scrolling, Deleting and Inserting

We now consider how to handle child ListView displays when the parent list's current item changes. A change in the currently selected Branch occurs when the item focus changes. This can be caused by
  • Clicking on another list item or moving to another item using the TNavigator component.
  • Inserting a new Branch. The focus will change to the newly inserted Branch.
  • Deleting a Branch. The focus will change to one of the remaining Branches or, if the list has become empty (zero Branches) will not have any currently focused entry.
The TListBindSourceAdapter has an extensive set of event handlers that are used for handling these conditions. In our case, the particular component we are interested in is identified by the Type Alias BranchListBSWrapper. When we create this object, we must also provide method pointers to the object so that the needed events are handled. In addition, we must provide the actual event handler code that will be executed when the event fires. First, take a look at the event handler code. Note that the signature is a requirement of BranchListBSWrapper.

Two things must take place when the Branch TListView Item focus changes:

  1. We must identify the current TListView object, that contains the TObjectList<TEmployee> property for the currently selected Branch.
  2. We must update the Employee wrapper to point to the TObjectList<TEmployee> property identified in the first step.
Note that the special case of an empty Branch list results in setting the Employee wrapper to a nil value. (No items are displayed.)

The first step is satisfied by locating the TBranch object using an expression with two casts to "dig down" into the Branch TBindSourceAdapter that contains a pointer to the current entry.

The second step updates the EmployeeWrapper (saved as a property of the TMDLBO class) with a pointer to the current Employee TObjectList<Employee> extracted from the Branch obtained in the first step. The SetList method is used to do this. It changes the pointer to the data that will be displayed by the TListView.

Finally, we reposition the Employee List selection to the first item and set the EmployeeWrapper to Active to display the Employee List contents.

There are some additional considerations when a master/detail relationship between two ObjectLists exists. When the focus of the master changes, LiveBindings must be updated to reflect the new detail list that is related to the master. This is shown by the following CreateAdapter event for our Branches list. After the BranchListBSWrapper has been created, three Event Handlers are specified so that synchronization will take place when the Branch Item focus changes. In all other respects, this OnCreate Event is identical to the one previously described, except, of course, it refers to objects appropriate to Branches.


This completes the examination of the MODEL code. There are quite a few "moving parts" to the entire solution:

  • Data classes
  • Data generators
  • LiveBindings components
  • Objects to be displayed by LiveBindings
  • ObjectLists to be displayed by LiveBindings
  • Considerations about creation order
  • Creation of LiveBindings objects at run time and linking them into other LiveBindings components along with specifying needed event handlers
  • Handling TListView scrolling in cases of master/detail relationships
  • Event handler code to implement desired behaviors when TListView entries scroll, are created or deleted
The number of lines of code required to achieve this is not particularly large (except for the actual data objects in your application, which will vary depending on the complexity of your data.) It does require that you "get organized" and perhaps develop a check list of required steps to ensure that you include all the necessary code.

Next we consider the final (and much simpler) piece of the puzzle, the VIEW.

Using Delphi LiveBindings With TObject and TObjectList<T>—Part 2 of 4—Database Details<==Previous
Next==>Using Delphi LiveBindings With TObject and TObjectList<T>—Part 4 of 4—View

Part 2 of 4—Database Details—Using Delphi LiveBindings With TObject and TObjectList

Source Code

The source code in the form of a Delphi Project Group is available at:
The project was developed using Delphi RAD Studio Tokyo (10.2.2)

The README file contains additional useful information.

Database Details

The application database is defined by three classes contained in the file DBLBO.pas. When instantiated, they form a tree structure not unlike a relational database having two master/detail relationships. Diagrammatically, they appear as follows (a full-sized PDF of this diagram is also to be found in the Docs folder of the Github project or can be downloaded here):

Delphi Livebinding Objects Data Structure Database Diagram
Delphi Livebinding Objects Data Structure

The Database Classes

TCorp

This class is instantiated a single time and contains information about the fictitious corporation used in the sample application. In addition, it contains a TObjectList<TBranch> property that is used to store all of the instances of Branches owned by the corporation.

TBranch

This class is instantiated once for each Branch owned by the corporation and that appears in the TObjectList<TBranch> property of the instantiated TCorp.

TBranch also contains a TObjectList<TEmployee> property that contains a list of the instances of TEmployee for all of the employees who are assigned to the corresponding branch.

TEmployee

This class is instantiated once for each Employee assigned to the Branch and who appears in the TObjectList<TEmployee> property of the corresponding TBranch.

Instantiation Hierarchy

The Create constructor of TCorp not only instantiates the TCorp object; it also creates three arbitrary Branches by invoking the TBranch.Create constructor for each of the branches.

Each invocation of the TBranch.Create constructor instantiates the branch and provides arbitrary properties, but also invokes the TEmployee.Create constructor for each of the employees assigned to the corresponding Branch.

In this was, as single call to TCorp.Create will result in the instantiation of the entire database.

Arbitrary Data

Each of the database object Create constructors provides for the specification of arbitrary data when invoking the constructor. In this way, the invoker provides the data needed for the instantiation.

Overloaded Creates

The constructors for TBranch and TEmployee have overloaded versions. In one version, the data used to populate the fields of the instance is provided by the invoker. This is the form used when the database objects are first instantiated.

The second form of Create does not provide for any values for the properties of the new object. This is the form used when the TBindNavigator components process the Add (+) button. 

Type Aliases

The DBLBO.pas file also specifies three Type Aliases:
  • CorpObjectBSWrapper that is a TObjectBindSourceAdapter<TCorp>.
  • BranchListBSWrapper that is a TListBindSourceAdapter<TBranch>.
  • EmployeeListBSWrapper that is a TListBindSourceAdapter<TEmployee>.
Using these Type Aliases solves a couple of problems.
  1. The naming conventions used by LiveBindings are incredibly bad. Class names like TObjectBindSourceAdapter, TListBindSourceAdapter and TAdapterBindSource make repeated use of the words "Source," "Bind," and "Adapter" with no clear indication of what a given class is supposed to do. Using a TypeAlias to change the name to something meaningful (they really are classes that wrap around Objects and Lists) makes it much easier to develop and understand the code.
  2. The objects referenced by the Type Aliases are, in fact, generic in nature as the Type Alias indicates. This is what prevents their specification as a component in the first place. By using a Type Alias the cumbersome generic notation disappears from view, again facilitating cleaner, more easily understood code.
This completes the examination of the database objects. Next, we'll consider the Model Details.

Using Delphi LiveBindings With TObject and TObjectList<T>—Part 1 of 4—Overview<==Previous
Next==>Using Delphi LiveBindings With TObject and TObjectList<T>—Part 3 of 4—Model Details

Part 1 of 4—Overview—Using Delphi LiveBindings With TObject and TObjectList

Source Code

The source code in the form of a Delphi Project Group is available at:
The project was developed using Delphi RAD Studio Tokyo (10.2.2)

The README file contains additional useful information.

Overview

Need

Working with another project, I had a need to import a JSON object with a number of properties, one of which was an array of JSON objects. This lends itself to a hierarchy of Objects and ObjectLists, so I set about constructing the needed data objects and parsing my input JSON (that comes from a file) to populate the objects I had created.

I also wanted to display the contents of the data thus imported using TListView components in a FireMonkey application using LiveBindings.

I realized that I didn't have much understanding about all of this so I set about learning a thing or three. What I share with you now are the results of those explorations.

Demo Project

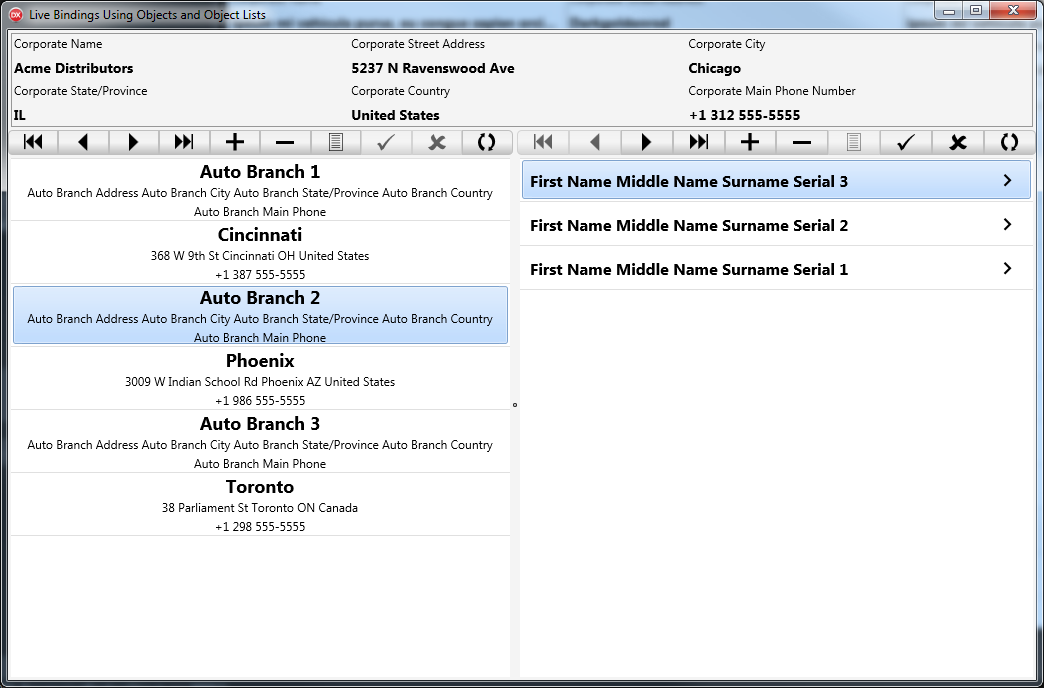
The Demo Project is named LiveBindingObjects.exe and when run, produces the following UI (a full-sized .png of this screen shot is also to be found in the Docs folder of the Github project or downloaded here):

LiveBindingObjects.exe User Interface Screen Shot
LiveBindingObjects.exe User Interface

Launching the Program

After cloning or downloading and unzipping the source project group (if necessary) make the project LiveBindingObjects.exe the active project. Choose the Target Platform if necessary. Note that this project is only intended to be a Windows desktop application. Press F9 or the Run button of the IDE.

User Interface Structure

  • At the top of the UI there is a panel that provides static information about a fictional corporation.
  • Beneath the top panel are two panels containing the following:
    • The left hand panel contains a Navigator control at the top while a TListView occupies most of the lower part of the panel and displays information about the corporation's branches.
    • The right hand panel contains a Navigator control at the top while a TListView occupies most of the lower part of the panel and displays a list of employees working at the currently selected branch from the left hand panel.

Using the Program

  • You can navigate to any of the displayed entries by clicking on the desired list item.
  • You can also navigate to any of the displayed entries by clicking on the Navigator buttons to move the selection.
    • The first four buttons in each navigator, Top, Up, Down and End move the corresponding List's selected item.
    • The next two buttons, Insert and Delete execute the corresponding actions in their corresponding List.
    • the final four buttons, Edit, Post, Cancel and Refresh respond, but in the present implementation seem to have no effect. They have been left for completeness although you can easily hide them since they currently serve no useful purpose.
  • When the selected item for Branches (the left ListView) changes, the Employees ListView (the right ListView) changes to display only the employees at the newly selected Branch.
  • Clicking the Add button (+) will insert a new item into the corresponding list using arbitrary values as placeholders. Each new entry has a number that advances by one for each new entry inserted.
  • When a new Branch is inserted, a blank Employee list is displayed as there are no employees for that branch. New employees may be inserted, however, for the newly inserted Branch.
  • Clicking the Delete button (-) will delete the corresponding selected entry after you respond Yes to a safety confirmation prompt. If you delete a Branch, all of its employees are deleted as well.
After a few changes, the UI might appear to be something like the following (a full-sized .png of this screen shot is also to be found in the Docs folder of the Github project or downloaded here):

LiveBindingObjects.exe User Interface After Some Data Changes User Interface
LiveBindingObjects.exe User Interface after some data changes.

Program Structure

This is a simple program, but it does have structure. 

MVVM, MVP and MVC

There are endless explanations, debates and disagreements on the internet about these three design paradigms. Yet all three paradigms seem to share the same fundamental functionality:
  • The presentation layer, or "VIEW" should contain as little logic as possible. They are difficult to test, and hence should be kept as simple as possible.
  • The data layer is handled by something called the "MODEL" that manages the data used by the application. It essentially hides the concerns about data from the VIEW. 
  • Between the VIEW and the MODEL is something that is variously called the VIEW-MODEL, the PRESENTER or the CONTROLLER. These three variations give the paradigms their distinctive names. It acts as an intermediary between the VIEW and the MODEL.
Arguing about the exact functioning or relative merits of these (and perhaps other similar) design paradigms is about as useful as arguing about how many angels can dance on the head of a pin. What seems to be universally true, however, is that if you bear in mind that the ultimate objective of these and other similar design paradigms is the separation of concerns, you won't be far off with designing well-structured, maintainable code.

Thus, for example, if you are building an application that screens loan applications, you will probably want to separate the code that queries the major credit bureaus from the code that updates the local database with the loan status. It makes no difference whether you call this a VIEW-MODEL, or a MODEL, or  CONTROLLER so long as you maintain a clean separation concerns you will probably end up with an easily maintained, testable application.

I would further submit that Delphi and Delphi's RAD is not well-suited to the ways that these current paradigms are understood, anyway, and attempting to put Delphi's round peg into a square hole will result in worse, not better structure and certainly a lot more code, much of it unnecessary. Just maintain separation of concerns and avoid putting code in the VIEW and you'll be well along toward producing quality, maintainable, testable code.

The demonstration program has two major areas of concern:
  1. Model and Database that manage the data used by the program.
  2. View that is the User Interface that presents data to the user and receives input from the user that is then used to drive the Model to perform the desired functions.

Model and Database

The MODEL is implemented by the file named MDULBO.pas that contains a single class that descends from TDataModule. It is a TDataModule descendant to permit dropping components on its design surface. The Delphi automatic form creation mechanism for this object has been disabled. Creation and Destruction is handled by the application code, not the Delphi provided automatic code.

Ancillary to this basic MODEL is file DBLBO.pas, that defines the three classes (all descended from TObject) that define the actual data used by the program. By creating these classes, the database is created. Also a part of DBLBO.pas are an enumeration (not used by the demo program) and three TypeDefs that will be explained in a later blog. The constructors for the database classes are also responsible for populating the created objects with appropriate data. Thus, database definition and initial population are all contained in these three classes. There is a more comprehensive discussion of these classes in a subsequent blog.

View

The view is implemented by the unit contained in the file VULBO.pas. It contains a single class, descended from the customary TForm ancestor. The automatic form creation for the VIEW has not been disabled and functions as expected. The VIEW contains a number of component definitions, and a pointer to the MODEL, but other than that, it contains almost no code, making it quite easy to test.

This concludes the present discussion. In the next post, we'll take up the Database portion of the MODEL in greater detail.

Thursday, June 22, 2017

Managing Credential Sets and Parameters: A Simple Delphi Value List Editor Component

The Problem

I am frequently called on to develop a solution that accesses a database or cloud service. During development the best practice is to develop using a test bed or "sandbox" to avoid potentially devastating real client data. This necessarily implies at least two sets of credentials to access the needed information: test and production. Sometimes, there are more than two, depending on the project requirements.

Additionally, some of the tools I develop have a general applicability, which is to say I may be able to employ the same solution for more than one client. This means even more sets of credentials as the tool is applied to additional client data.

Add to this some of the complexity inherent in credentials—and I'm thinking specifically of something like OAuth2 that has numerous data items from client IDs, to secret keys, redirection endpoints and so forth—and just managing multiple sets of credentials becomes tedious and error prone.

Further, it would be nice if changes to credential sets (or parameters sets or any other kind of set that might be fluid) could be made a run time rather than having to modify source code and recompile an application. 

The Solution

The first thing that comes to mind is to use a Value List Editor component to make it easy to manage credential sets. This is a good start, but something more is needed to make it truly convenient to implement as well as run-time friendly.

The solution I came up with is a simple Delphi component called TGetCredentials, that displays a dialog that permits management of credential sets stored in a .ini file and allows their creation, retrieval, update and deletion (CRUD) using a set of intuitive buttons.

TGetCredentials Component

The dialog GUI looks like this example, that might be used to manage credentials for accessing a Google API:


The desired set is chosen from the Drop-down Combo Box that retrieves the set from a .ini file and displays the contents. The set can then be modified or in other ways manipulated if desired. Finally, the user may cancel the retrieval (the dialog returns mrCancel) or elect to use the current values (the dialog returns the newly selected credentials along with mrOK).

.ini File

The .ini file is a standard .ini file; i.e., a text file divided into a number of sections that are named by a section header enclosed in brackets and followed by any number of name=value pairs.

The full path and filename of the .ini file is specified by associated component properties. The file must be manually created in the specified location and it must be populated with at least one section named *model. *model is used to create new credential sets; whatever the contents of *model, those are copied to the new credential set. By basing the credential sets on a programmer specified model section you may specify any items in the set as desired.

Using the Component

The TGetCredentials component can be downloaded from GitHub:

Documentation

More extensive documentation on using the component is available in the Doc folder of the project. The contents of the .chm file (MS Help) and the .pdf are identical; either may be selected.

Download the Component

You may either download a .zip file with the project or clone the project using one of the several available Git tools. If you download the .zip file, you must unzip the project to use the contents (which require compilation and installation.)

Using the Component

More comprehensive documentation about using the component is contained in either of the two documentation files in the Doc folder. In general:
  • Compile the .bpl projects.
  • Install the design time project.
  • Launch your own project that will utilize the component.
  • Drop the TGetCredentials component on a form.
  • Configure the TGetCredentials component appropriately.
  • Create the .ini file (including the *model section) to match the specification you made in the TGetCredentials component properties.
  • Use the appropriate methods in the TGetCredentials component to display the dialog, retrieve the desired credential sets, and incorporate the retrieved values into your own code.

Disclaimer

The TGetCredentials component is offered at no charge and has no guarantees. You are responsible for ensuring correct results and I offer no guarantees of any kind.

Feel free to leave comments and corrections here.

Thanks for visiting.

Tuesday, May 23, 2017

Delphi OAuth2 Authenticator Component for Google

Delphi OAuth2 Authenticator Component for Google
Encapsulating a Perennially Irritating Task
  1. Reference

Links and comments are current as of May 23, 2017. Programming for Google is really like trying to hit a moving target with a bow and arrow. You may have to hunt around a bit to find what you’re looking for if you come across this blog a year or so from now.
  1. Component Code

The project that contains the component is available under the MIT License from https://github.com/Pasquina/GoogleOAuth2Authenticator. Please note some caveats:
  • No guarantees. Your risk.
  • The code has only been developed and tested using a VCL 32-bit application. It should work for Windows 64-bit, but I’ve never tried it.
  • With additional work, you might get this to work for Android and OS X.
  • FireMonkey is not currently supported. This is because the component instantiates a TWebBrowser component that is VCL-only. Additional code can probably extend the component for use with FireMonkey as well.
This is pretty much alpha level code, with lots of features yet to be added. If I ever need to, I may add them but right now I don’t plan on doing more work on this.
  1. Overview

Every time I need to write code to access a Google REST API I’m faced with the same tedious and error-prone task of coding the OAuth2 Authentication routines I need to gain access. The basic steps are:
  1. Determine all of the various endpoints, URIs, and other constants that Google requires for its implementation of OAUTH2. OAUTH2 is not really a protocol, but rather an “architectural style” so Google’s ideas are generally somewhat different from those of, say, Facebook or Twitter.
  2. Set up the target Google account to accept the necessary REST calls. This involves enabling the needed APIs (if not already enabled) and registering your application to obtain needed Client ID and Client Secret.
  3. Code the requisite browser object, provision it with the proper URL (concocted of many of the things mentioned previously), allow the user to authenticate and authorize your app for access, and finally scraping the reply screen for the needed Access and Refresh Tokens along with an Access Token expiry interval.
Adding to the confusion is the Embarcadero provided REST Debugger that sort of kludges together a bunch of different “architectural styles” from a variety of websites into a single monolithic blob of code that only a mother could love.
The DocWiki for RAD Studio Berlin is a much better source of information about the REST Client Library. See REST Client Library. The DocWiki suggests with reference to TOAuth2Authenticator: “Because of the heavy dependencies to the service providers, a generic component like this can only give some support and provide the infrastructure to follow the workflow of the service provider. You might want to inherit from this class to create an authenticator class specific to a service provider.”
That sounded like a pretty good idea to me, so that’s what the rest of this post is about. It’s actually pretty easy to do once you collect all of the detritus needed for creating the code.
  1. Finding Information and Preparing Google

    1. URIs and Endpoints

The easiest part of all of this is downloading Google's Well-Known Open ID Configuration. It has a couple of things you’ll need like the authorization-endpoint and token-endpoint. You’ll also want to take a look at OAuth 2.0 for Mobile & Desktop Apps. Scroll down to the redirect-uri values section, Manual copy/paste subsection. It says simply urn:ietf:wg:oauth:2.0:oob.You’ll need that later.
    1. Scopes

You’ll also need whatever API Scopes you intend to access. Visit OAuth 2.0 Scopews for Google APIs for a dazzling array of choices. You can use one or more than one in your application. When specifying multiple scopes they are separated by a space.
    1. Create a Project or Use an Existing Project

First, you’ll need to visit Google API Manager while you’re logged on as an administrator of the target Google Account. There’s a little obscure reveal-triangle near the top left of the screen. If you click that you can choose from an existing project or create a new one. If you create a new project you’ll be asked to give it a name.
    1. Enable the API(s) You Need

Next, choose the Dashboard menu item on the left and then click Enable API. This will reveal yet another dazzlilng array of choices. Click on the API you plan on using to display more information about the API. To enable the API for your project, click Enable at the top of the screen.
    1. Obtain Your Credentials

Click on the Credentials menu item to the left. If you plan on using credentials already created, simply click on the desired name I the OAuth 2.0 client IDs column. To create a new set of credentials, click the Create credentials button.
You can also delete credential sets if you decide you want to disable all access using the deleted set. If you lose your credentials, you can always return to this page to obtain them again.
    1. What’s Missing?

You should now have all the information you need to Authenticate your Google app. What’s missing? Actually, we haven’t talked at all about the REST requests you’ll need to make to get your app to do useful work. For a list of Google APIs, visit Google APIs Explorer. The possibilities are staggering and well beyond the scope of the present post. It is assumed that you know what you want to accomplish, and it’s simply a matter of making the proper requests to the appropriate Google API.
  1. Using TOAuth2AuthenticatorGoogle

    1. Configuring the Components

Drop the following objects on a form: (A data module works well.)
  • TRESTClient
  • TRESTRequest
  • TRESTResponse
  • TOAuth2AuthenticatorGoogle
  • TRESTResponseDataSetAdapter (Optional if you want to convert the response JSON to a dataset.)
  • TFDMemTable (Optional if you want to convert the response JSON to a dataset.)
Connect the components in the customary fashion. Configure your TRESTRequest to make the appropriate request for what you intend to accomplish. The DocWiki page REST Client Library has some excellent points about TRESTClient and TRESTRequest. Give some attention to properly configuring the following properties:
  • Base URL (TRESTClient)
  • Resource (TRESTRequest)
  • URL Segment Parameters (TRESTRequest) that make “substitutions” in the query string
  • Other parameters (TRESTRequest)
  • Cookie Parameters
Finally, be sure to configure TOAUTH2AuthenticatorGoogle correctly. The properties you should already have if you have followed all of the steps above are:
  • AccessTokenEndpoint
  • ClientID
  • ClientSecret
  • LoginHint (this is a Google feature and if you know your anticipated username for the authentication, specifying it in this parameter will help speed the authentication along)
  • RedirectionEndpoint—remember urn:ietf:wg:oauth:2.0:oob? Here’s where it goes.
All other properties can be left at their default values. Please note, the AccessToken property is used by the component to decide whether OAuth2 must be used when the RESTRequest is made. Leave it blank and OAuth2 will be invoked to fill it in. To force your app to reauthenticate, set this property to blanks and it will reauthenticate at the next request.
    1. Invoking Authentication

Authentication is not a separate step using this component. It is an automatic part of making a REST Request. Thus, in order to authenticate, you must have a valid REST Request configured. For example, you might want to retrieve a list of G Suite Users. To do this, configure the Authenticator properties with the necessary endpoints for authentication and also configure the TRESTClient and TRESTRequest to make the customary API request for users. Then invoke the Request: e.g., YourRESTRequest.Execute; authentication is an automatic precursor to executing the API request.
    1. Component Code

Component code is straightforward. If you download the code from GitHub you can easily follow the explanation that follows:
      1. Procedure DoAuthenticate; override;

This is the control routine for authentication. When a REST Request is made (for example, for a list of G Suite Users) this routine handles necessary authentication. After authentication, normal processing is resumed using the inherited keyword.
      1. Procedure WebFormTitleChanged

This is an event handler for the TWebBrowser object that is instantiated to prompt the user for authorization. It scans the title string for the authorization code returned by Google. Upon finding the code, it saves the code and closes the Web Browser.
      1. ProcedureGetAuthCodeGoogle

This routine instantiates a TWebBrowser, builds the appropriate URL, and then displays the Web Browser with the URL that causes the appropriate authentication request to be made to Google. The user then interacts with the response, and if the request is approved, Google returns an authorization code that is extracted by WebFormTitleChanged.
      1. ProcedureGetTokensGoogle

This is the final step in OAuth2 Authentication. After the authorization code has been obtained successfully, DoAuthenticate invokes this routine that builds a TRESTClient object and a TRESTRequest object. The Request parameters ask to exchange the authorization code for the Access Tokens and Token Expiry. If successful, the Response contains the tokens and expiry interval in seconds. These are extracted and appropriately stored for later use. Note that it is not necessary to construct a Response object; if none is specified in the Request object, the Response is created automatically.
  1. Conclusion

For me, OAuth2 is a major distraction from actually getting an application to run. This somewhat trivial component has helped me to organize my efforts and get on with the real point of my development efforts.
I hope it helps you, as well.
Comments and corrections welcomed.


FireMonkey String Grid Responsive Columns

FireMonkey String Grid Responsive Columns Code to Cause Column Widths to Change When String Grids Are Resized Overview I have a FireMonke...